Warning: Constant WP_CRON_LOCK_TIMEOUT already defined in /home3/santork0/public_html/wp-config.php on line 102

Warning: Constant AUTOSAVE_INTERVAL already defined in /home3/santork0/public_html/wp-config.php on line 103

Warning: Constant WP_POST_REVISIONS already defined in /home3/santork0/public_html/wp-config.php on line 104

Warning: Constant EMPTY_TRASH_DAYS already defined in /home3/santork0/public_html/wp-config.php on line 105
Photos of Santorini – Photos of Santorini

Tag: Photos of Santorini

  • Santorini photography tips – what I have learned – Part 2

    Sorry – where was I? Oh yes.

    I was telling you what I had learned – this is part two of my Santorini photography tips post – too long for a single post!
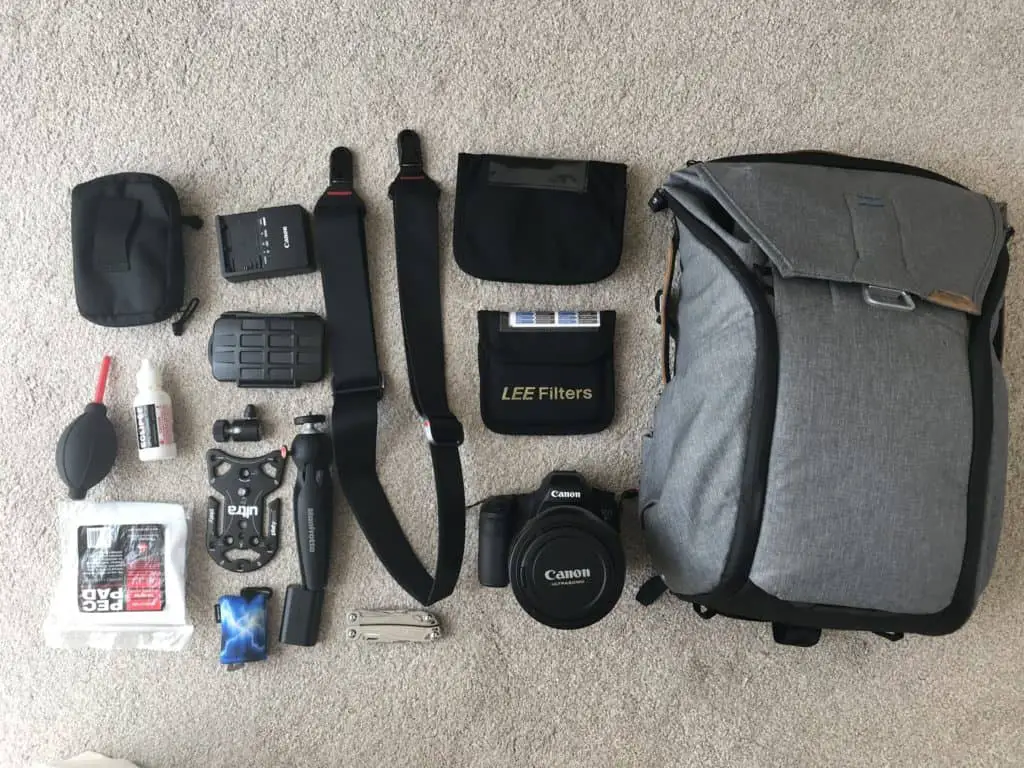
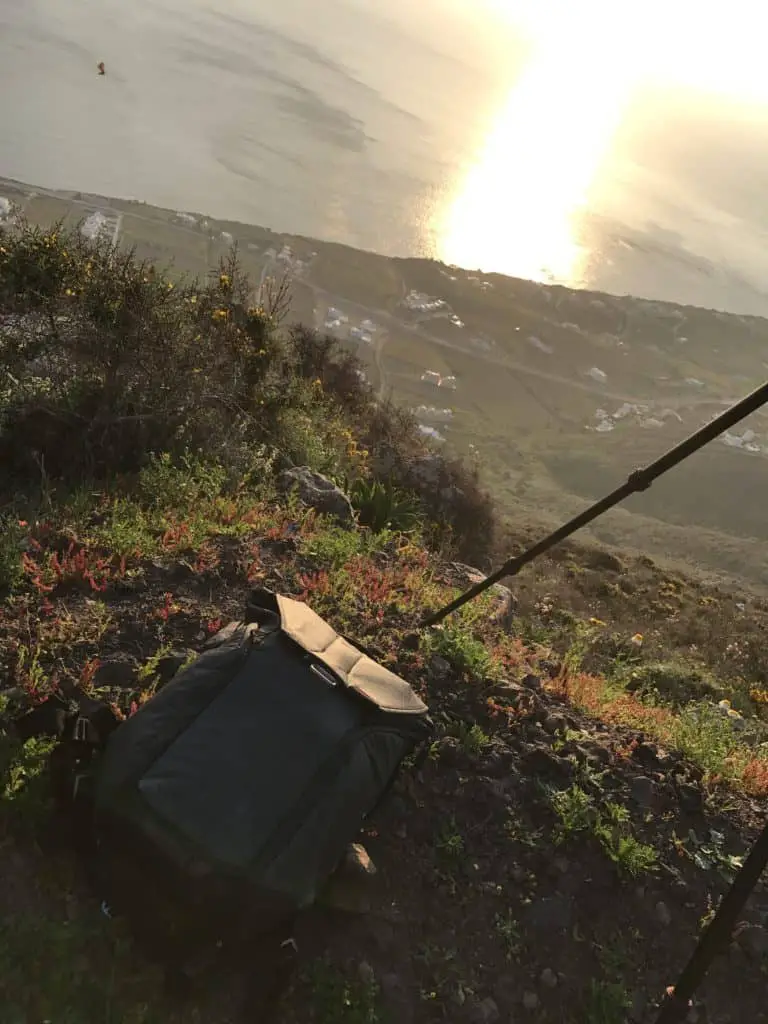
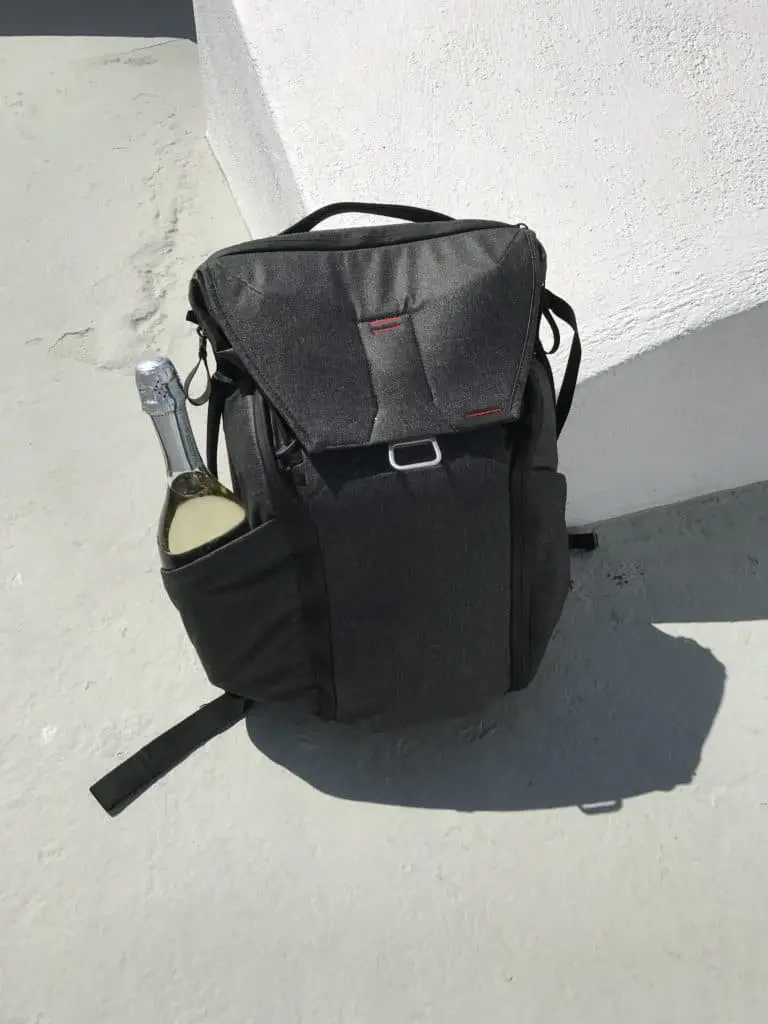
    Camera bag

    I use a Peak Design Everyday Backpack. This is on a day-to-day basis in the UK and also when travelling. When travelling I empty my bag completely, and split the stuff I need to take with me into stuff that goes in my checked luggage and stuff that goes in my camera bag, which is my hand luggage.

    Here it is with a bottle of Prosecco in the tripod holder! Such a versatile bag!

    A bottle of Prosecco in my Peak Design Everyday Backpack

    And here it is on top of the caldera.

    Peak Design Everyday Backpack on the <a href=
    Santorini caldera” width=”790″ height=”593″ /> Peak Design Everyday Backpack on the Santorini caldera

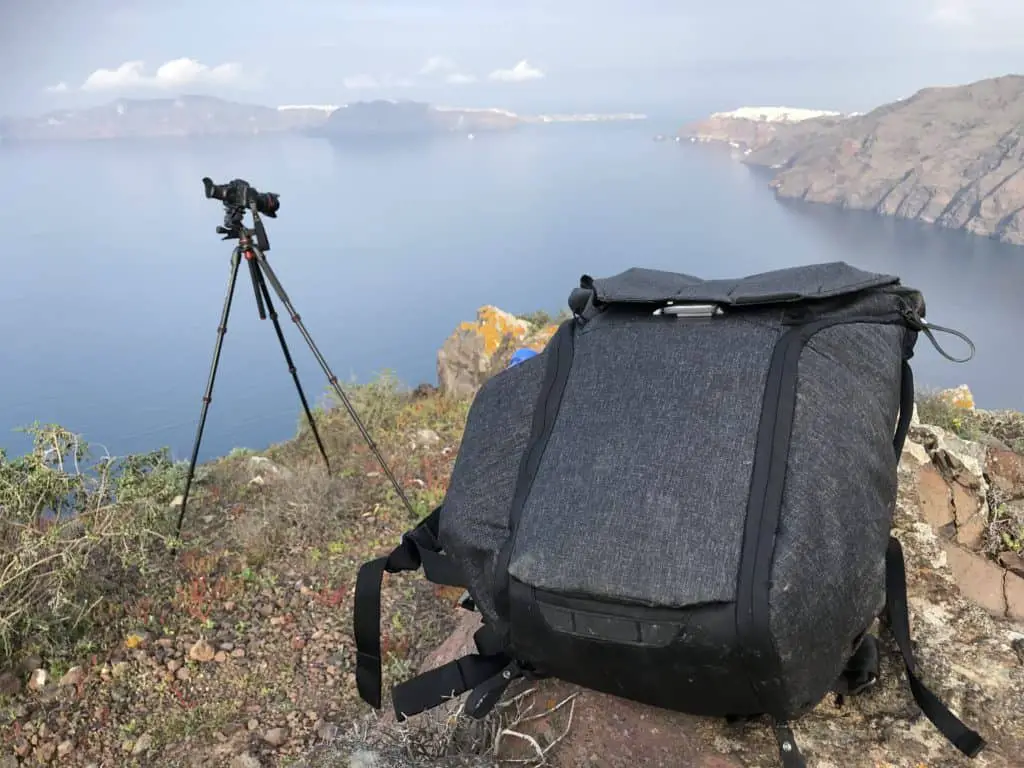
    I only take the stuff I need on a trip, and only take the one bag which easily carries all the gear that I need. I don’t want to be weighed down with loads of stuff – I am on my feet for hours and hours every day after all.

    And I am quite old.

    And I hate taking gear with me which I don’t get round to using.

    I like to travel light and agile.

    Data management

    OK this is one of those things that I think I can improve on. I take all my blank, freshly formatted memory cards, which are stored in a secure, durable, hard waterproof case with yellow trims.

    At the end of a days shooting I take any cards that I have used and put them in an identical case but with a red trim. This stays in the hotel room. If I drop my bag off a cliff the next day, which is a possibility lets be honest, all I have lost is the images I took that day. Forget my gear – that is insured.

    I can’t replace the images that I have taken so reduce the risk by doing this. I don’t take a PC with me on trips anymore, just my iPad. I am thinking that I need to buy a device to give me an additional back up, some way of getting the stuff I have taken onto the cloud.

    This is something I am seriously considering at the moment. I have not lost any data to date, but this is not a reason to not improve on what I am doing at the moment.

    And thinking even more I did not backup my iPhone to the cloud – another thing that I need to think about.
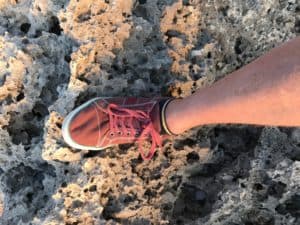
    Shoes

    Yes shoes. I took these shoes to Santorini. Red Moshulu pumps.

    I was travelling light after all. So light I did not give this a seconds thought. Until I got there that is. And it was fine on day 1. Well my feet were a bit achy but ok. Day 2 they were a bit fragile in the morning, and by day 5 there were physically sore from the constant daily pounding on the hard surfaces I was walking up and down.

    I keep on writing about this to make sure I never forget to take proper walking shoes – these aren’t exactly heavy after all.

    And I do have a pair of walking shoes, some lightweight grippy soled wonders made by Salomon which I have had for years now and enable me to clamber all over the place like a nimble mountain goat.

    Well sort of.

    Do not forget proper shoes.

    Hats

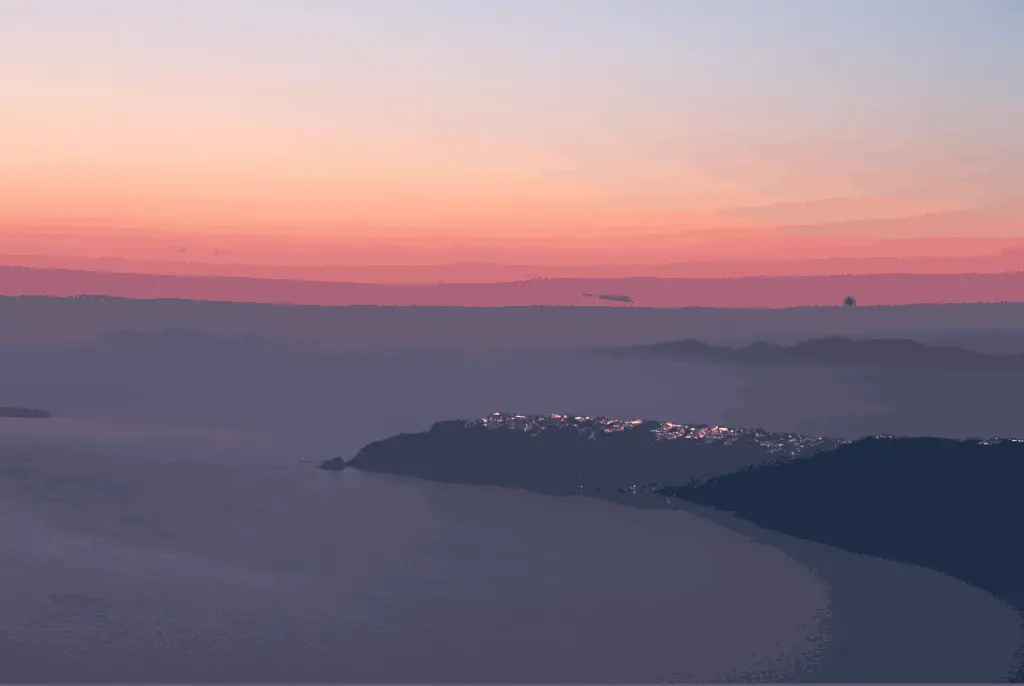
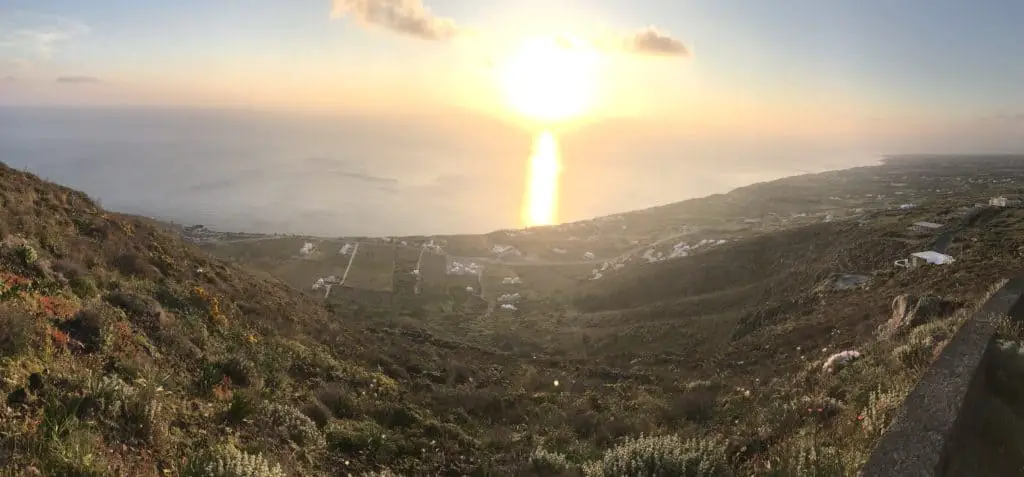
    It is cold at 4am in Santorini in April. And I have very little hair. So I need a hat. When you are sat there for a an hour on the top of the caldera before sunrise with the wind blowing it can get cold.

    Me, Rick McEvoy on Santorini at sunrise

    And then when the sun comes up it gets warmer but on this occasion it was still not hot until mid-morning so I need two hats – a thick woolly one and a thinner lighter one.

    I happen to have two red North Face hats, which you can often see me wearing on those rare photos that I am actually in.

    No jacket required

    I checked the rainfall stats and decided to wing it with a fleece. That would deal with the light rain no problem, and if it really hammered it down I would be diving into shelter anyway.

    That was the plan.

    The reality is that where I was there was no shelter, so if it had rained I would have been well and truly done for. And with wet feet as well. Thankfully my camera bag is waterproof.

    So, next time I am going to have a lightweight windproof shower proof top that will give me the protection I need – lightweight layers is the way forward.

    Obviously in the UK I have a range of cold and wet weather clothing permanently in my car.

    Snacks

    Snacks are important. And I didn’t take any. So I had to just buy whatever I could find. This is a mistake I keep on making – I keep forgetting to get suitable snacks for 5am in the morning. I end up with things like Mars Bars, which are all good and lovely, but can be a bit messy out in the field and if not eaten melt and get squashed.

    I need to come up with the best snacks for photography – now that I have written this I have reminded myself that I need to sort this before I leave for my next trip, and not wing it when I get there.

    The other problem is that I tend to forget this when I am away. Sunsets merges into drinks and dinner, and when we get back to the hotel after dinner this is when I pack my bag. This is when I realise that I didn’t get any snacks. And by then it is too late to do anything – shops open at 10pm are pretty limited in Imerovigli after all!

    Drinks

    Really the same point as above – I normally end up with a can of Pepsi Max at 5am whilst I am sat all set up waiting for the sun to rise. Not the best drink for that time of the day.

    Water and cordial concentrate are the fix to this – the problem is the quantity of water I need and how I carry it. Basically I need to be able to carry a second bottle.

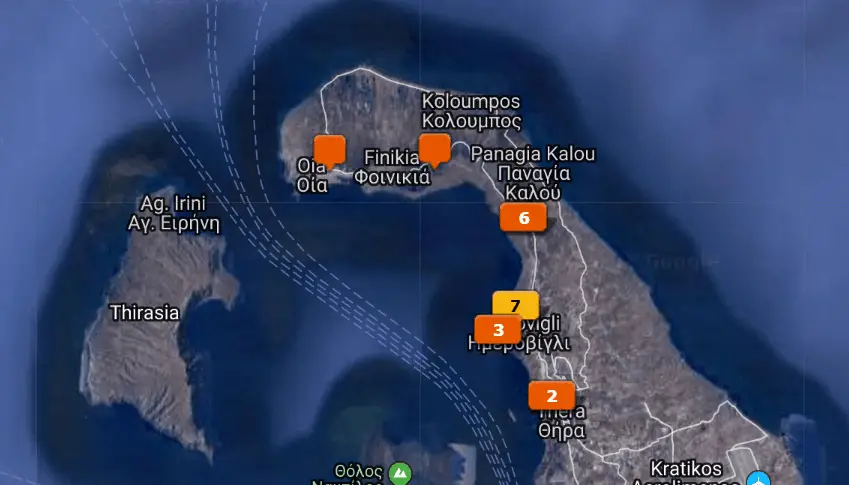
    Where to eat in Santorini

    Well there are lots of places, but the one place that we really loved was actually a take away place in Imerovigli. I know tragic but it was that kind of busy trip.

    As this is not a travel guide to Santorini I will get back to the photography stuff.

    But the Chicken Gyros was completely ace!

    Getting home

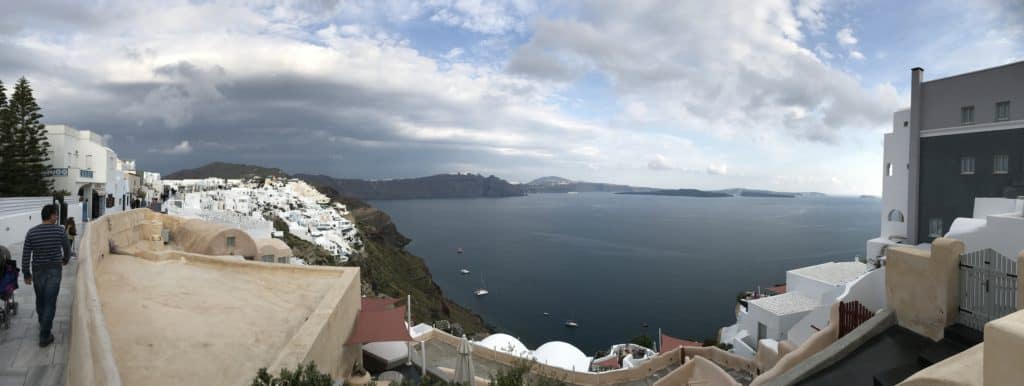
    The worst part of any great trip is leaving. Yes we all have to do it. Going to the airport was the first time I had left the caldera in days, apart from when we walked to Oia that is.

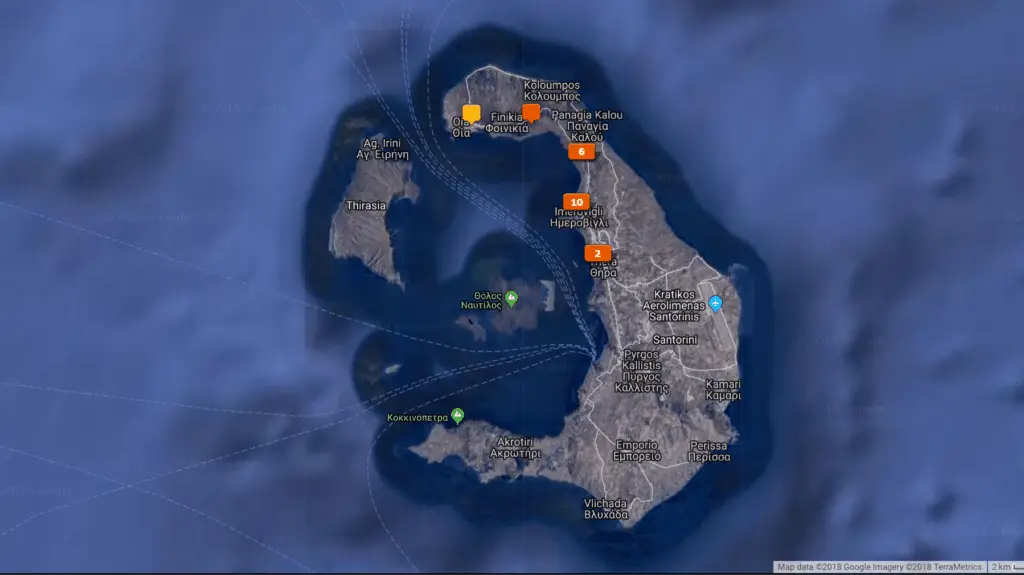
    The beauty of a small island is that the airport is never far away, if there is an airport that is.

    Check out my other website Paxos Travel Guide for more on that! No there is on airport on the Greek Island of Paxos.

    What is Santorini airport like?

    My memories of Santorini airport are somewhat limited. I remember standing outside in the last of the sunshine before having to return back to the UK in April – that would be the last sun either of us would see in a while! And having checked in we walked into departures, which was pretty much a room with nothing other than basic WCs. And we just waited in that room for an hour before being released!

    Insurance

    Boring but important – make sure you are insured, and that your photography gear is insured. And if you are working commercially you will need Public Liability Insurance. And you will need general travel insurance.

    Basically – be insured.

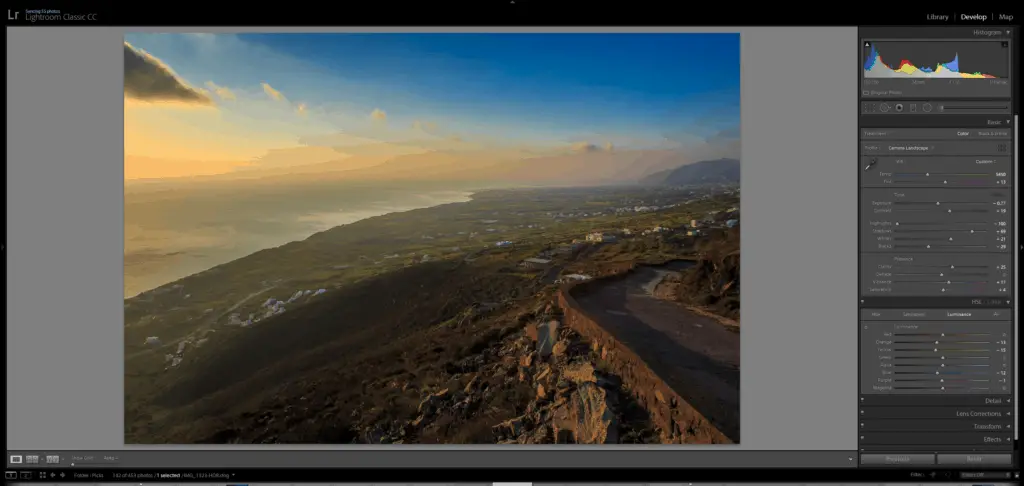
    Importing into Lightroom

    This is the first job when I get home. Well the first photography job that is. I need to get the images onto my PC external hard drive and also backed up to the cloud. And I also do a third backup to another external hard drive, which is stored off-site.

    Only when this is done do I delete the images from my memory cards.

    I always have the images in three separate places.

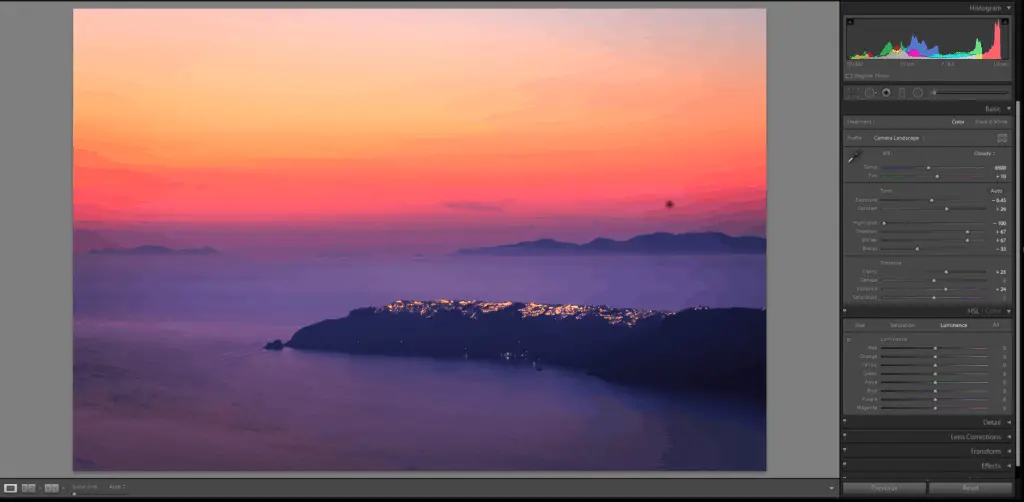
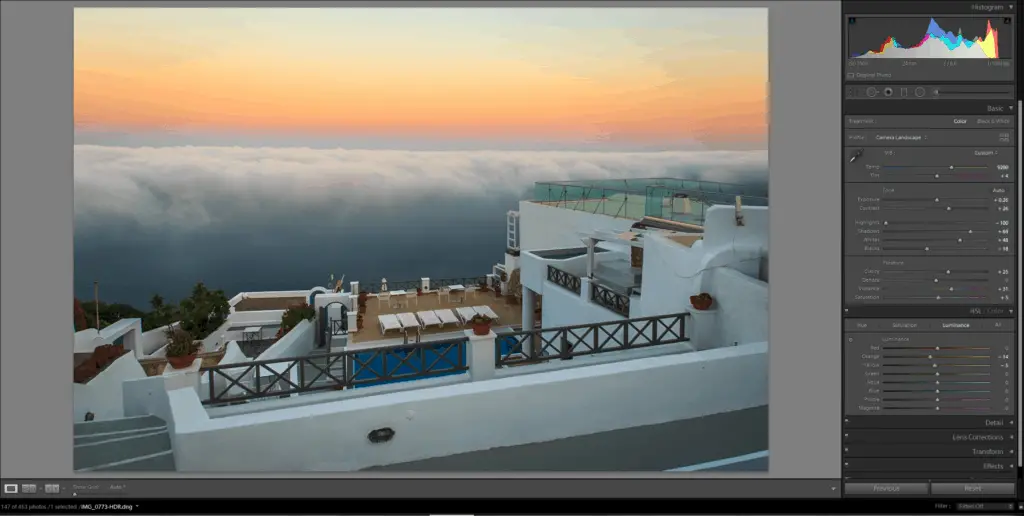
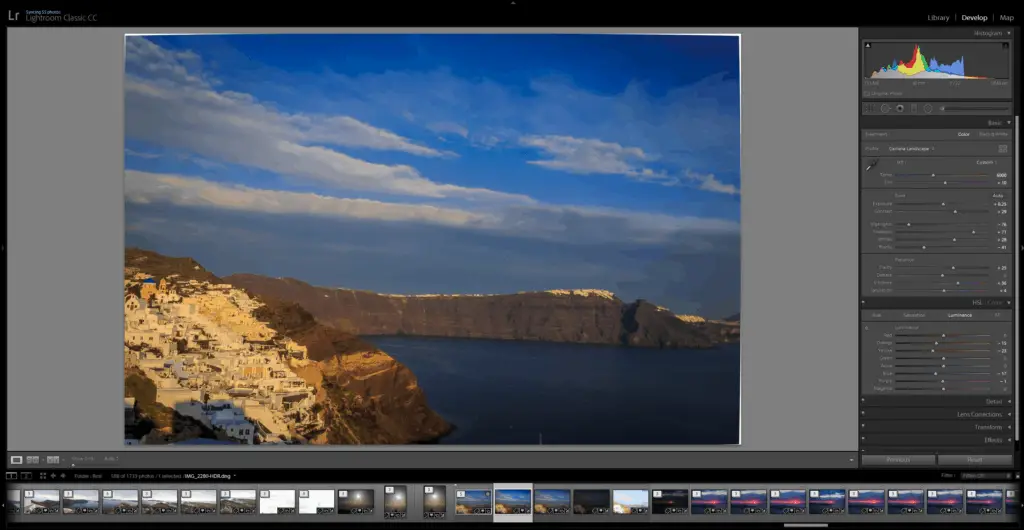
    When I import images into Lightroom I apply develop pre-sets. These get my processing off to a start. I apply the following adjustments to every image on import.

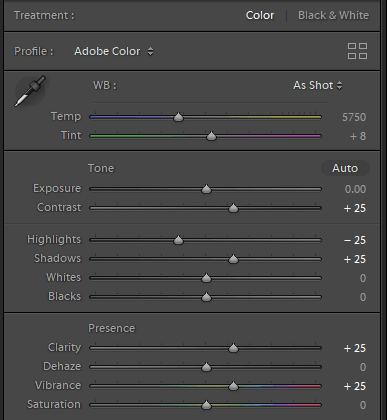
    I also add my copyright information in a metadata pre-set.

    Last thing I do is put the images in a folder called Santorini 2017 – obvious and effective.

    I also put the sets of three bracketed images into stacks, so only the first image is visible. This helps enormously with image selection.

    I know that this slows down the importing process but I start to import from a card then go off and have a beer or do something else. Once the images have been imported from a card I put the card in a black fabric SD cardholder which lives in a drawer in my office.

    Yes I really am that cautious with my memory cards.

    Getting down to 20 images

    Once the images are in Lightroom I then have to decide which images I want to edit. Now if I was starting afresh with this set of images, knowing how many images and what I want to do with them the process would go like this.

    First pass – go through the images one by one, then hit the P key for any image I like the look of.

    Once done I select the filter bar at the top, so only images which I have picked are visible.

    I then go through the images again one by one, and anything I am not sure of using the U key I Unpick the image, removing the flag and removing the image from view.

    I keep on doing this until I have a selection of images that I can look at in Grid View. I am now looking for the images that will make up a cohesive set. I make the images as big as possible in Grid View (getting rid of the side bars using Control Tab), and basically keep on unpicking till I am down to the number of images I want, in this case 20.

    Once I have 20 images I put them in a new sub-folder called Picks. I then move the rest of the images into a new sub-folder called simply Rest.

    Last thing is to add these 20 images to a Collection in Lightroom so I can view them using Lightroom Mobile on my iPad and iPhone.

    Sorry last thing is to remove the flags – I don’t need them any more.

    As to processing in Lightroom, that really is a subject in it’s own right.

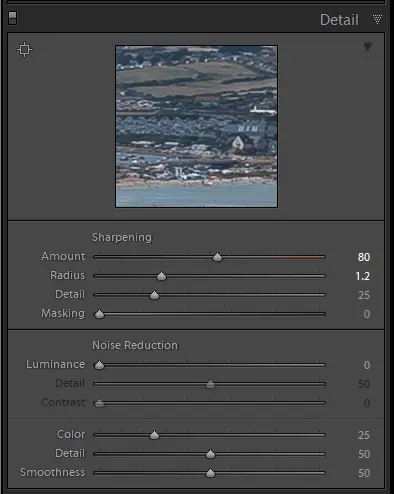
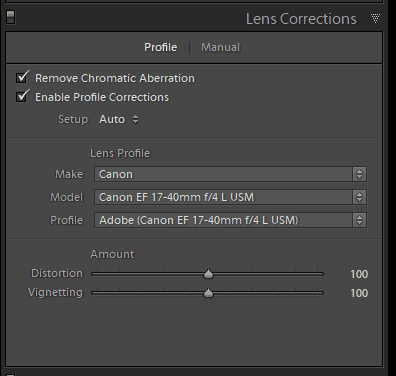
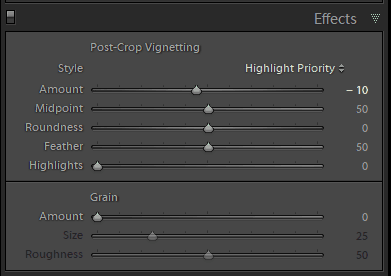
    • I work in a logical sequence, which is this.
    • Crop/ Transform
    • White balance
    • Basic Panel
    • HSL Panel
    • Effects

    And then I go to Photoshop to remove bits and clean up images.

    If you want to know more about how I edit my images check out my main website and my weekly photography blog.

    What about the other images?

    I took over 2000 images, yet there are only 20 on this website. What am I going to do with the other images? Well there were going to be 100 images on 100 blog posts, but I realised that this would be a big mistake – I dont have the time for that much as I would like to.

    I have other websites to create!

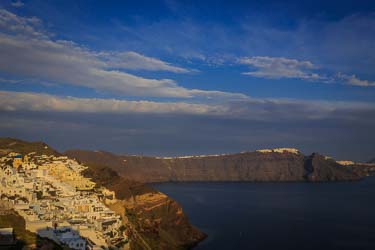
    I have created a gallery titled My Big Fat Greek Photo Gallery with all the images that I have edited. There are 99 photos of Santorini in these five galleries.

    I was not going to do much with the other images until I had this change of mind – I would like to make money form my photography work, so placing them on my own website was the right thing to do.

    Once this is all done I am going to wait, possibly 6 – 9 months, before I add anything else to this website. I need to see if the website performs as hoped.

    Lightroom metadata

    Metadata on images used to be a real problem for me until I worked out one thing, which is this.

    You only need to add metadata to images if you are going to put them somewhere other than on the hard drive where they live. Taking the set of photos of Santorini for example, I spent too much time trying to come up with a plan for the metadata, but in the end this is what I did.

    Copyright info – this is applied on import

    Filename, title, caption, keywords.

    Out of all the photos I took in Santorini, I only need to worry about the metadata to the images that I am going to post to my website.

    That is 20 images only.

    Well 99 actually!!

    I have done the work on the metadata properly for all 99 images – it didnt take too long in Lightroom and once done it is done.

    There are some keywords which apply to all the images, such as

    Santorini, Greek Islands, travel, tourism

    I apply those to every image.

    And then I add keywords relevant to each particular image – think of this as describing each image in words to a search engine.

    Now I know people say that keywords are less important than they were, and maybe even irrelevant now, but I still feel this is worth doing. It took me circa 2 hours to keyword, title, file name and caption all the images on this website. And this was done in Lightroom, so only needs doing the once.

    I change the filename of each image individually so the keyword relevant to that image is in the file name, and also in the title and description. The description field is a longer amount of text describing the image in more detail. I use the same text in the title as I do for the filename to be honest.

    It really is that simple.

    Keyword research

    I use the free keyword search tool in Moz. I can do 10 keywords searches a month for free. I don’t use the Google keyword search tool any more. It is my understanding that this should be used when trying to find keywords for Adwords, ads bought via Google. Which I do not do.

    The other thing that I do use is the Google search function – I see what the autocomplete does, and also other searches listed at the bottom of the page.

    Things I wish I had done better

    There are things that I could have done better. There are things that went just fine. And there are things that I have learnt.

    All good stuff – what I want to do is develop what I have learnt and improve on certain areas, which I will write about here. These things are all relevant to helping you and I improve our photography in various ways. Photography is after all a love, a vocation and a journey.

    We never stop learning.

    Gear

    What could I improve with my gear? I think the main thing would be the systematic photographing of it for commercial uses.

    As to the gear itself it all worked perfectly, and I did not miss anything. There are a few specific things what I will write about later.

    The only thing is that I would love to have a much smaller camera/ lens combo than my Canon 6D and various lenses. They were all good and lovely on this trip, but I find it too much of pain. Especially on family holidays where apart from when I go out to shoot a sunrise I have found myself sticking with my iPhone.

    GPS capture

    I need to make sure that the GPS is on and working as quite a few photos have the GPS data missing. And if I took iPhone photos at every location I know that I have the data there. More on this later under lessons learned.

    Video capture

    Basically I need to do more videos using my iPhone 7 Plus. Lots more videos

    • Behind the scenes
    • Images being taken – I love these
    • Me talking to the camera explaining something
    • Me talking whilst filming a location
    • Videos showing my photography gear
    • Video blog posts – something I have been thinking about for a log time now

    Audio on video

    The audio on my videos is quite dreadful I need to get a mic for my iPhone 7 Plus – I have one for my iPhone 5C but the lightning connector is now the headphone jack (thanks Apple) so my Rode Video Mic won’t plug into my iPhone 7 Plus.

    That will provide a significant improvement in the quality of the videos that I produce.

    More systematic approach to daytime shooting

    Whilst I love wandering around and finding things to take photos of, and I don’t want to lose the spontaneity of my photography trips, I need to be a bit more systematic.

    And I don’t want to pre-plan everything, and research locations to death so I am going to location A to get a shot, then location B for another shot etc.

    There is a happy medium in-between the two, which is where I want to be. Have a bit of a plan, and make sure that I cover all the aspects of a location while I am there. That means not going back to places unless there is something new to be captured, and a bit more stuff in built-up parts of locations.

    Lessons learned.

    There are a number of things that I could do better. With everything I do I try to make improvements where I feel I need to. These are the things that I need to work on.

    Backing up my photos.

    I am not happy with my current plan. This has not caused me a problem, and I have not lost any images yet, but I think there are improvements that I can make here. I need to get some device that will allow me to back up my images to the cloud when I am on a trip.

    Clothing

    I need something that is lightweight, windproof, waterproof and small and light enough to be able to be folded away in my camera bag somewhere.

    Image capture

    I need to spend more time and thought on recording the image capture process – I am talking here about behind the scenes photos and videos.

    Video

    I need to improve the standard of my videos. I need to use my DJI Osmo Mobile. Well to use my DJI Osmo Mobile I need to take it with me. And to take it with me I need a bigger bag.

    And If I get a bigger bag I will solve my coat storage problem, and also my water-carrying problem.

    Getting back to the problem I need to vastly improve my video production – all I am doing at the moment is pointing my iPhone at things and hoping. Some of my more recent stuff has been much better to be fair.

    I need to think more about my video capture and take it as seriously as my still image capture.

    And I need to do more videos where I am talking to the camera and describing what I am filming.

    Thankfully my videos are so poor improvements will be significant and easy to achieve.

    More gear shots

    Photos of my gear have value, and can be used in blog posts on my main website as well as on travel photography websites. These photos have a commercial value and need to be built into every shoot.

    Story telling,

    I need to decide what I want for a website before I go on a trip. This will be much easier having produced my first travel photography website, and work has already started on my second website.

    Rather then getting back from a trip and wondering what to do with the stuff I have captured I now have a plan to take with me on trips so I am producing the content whilst I am at a location – a much more effective way of working.

    And I can incorporate commercial and promotional shots into this story telling.

    Daily journal.

    This was the big learning point from my trip to Paxos, which was after I had started work on this website. This was the part of the realisation that I needed to approach this part of my photography business in a different way, which is what I have done. I wrote a daily journal while on holiday in Paxos, with nearly 15,000 words written on my iPad, which with refinement will end up being nearer 20,000 words with accompanying images, making about 1/3rd of the content of that website.

    iPhone/ DLSR captures

    This is a big one for me. I need to combine my iPhone photos and videos with the photos taken on my Canon DSLRs in a much better way.

    And also take more videos on my Canon 6D.

    Will this be as simple as importing all the photos and videos into Lightroom? It really could be that simple.

    Time zones

    I often forget to change the time on my camera. Infuriating but a mistake I really should not be making. Thankfully I can change the image capture time in Lightroom after the event.

    Snacks and drinks

    Yes I need to sort this. Basically I need more food and drinks when I am out and about on my feet for hours on end. And a bigger bag!

    It seems that one of the main things is that I need a bigger bag!

    My Santorini website

    What was the end point of all of this? A brand new website called Photos of Santorini. And this is the last post on this website.

    When I say last post I mean the last post for now. I might come back to this website and add more photos but for now this it.

    One website, 20 blog posts about 20 photos, 99 photos in galleries, and one big post putting all the bits together. Two big posts in the end.

    And that Big Fat Greek Photo Gallery – well I had to call it that!

    If this proves to be a successful website it will act as the template for other travel photography websites from my travels all over this wonderful planet of yours.

    Summary

    I hope that you have found my round up posts titled Santorini photography tips helpful – you can get back to the first part of this post here.

    And with that I will say goodbye for a while.

    Oh yes – please don’t forget my other website Paxos Travel Guide which I am going to get back to work on now.

    One last thing

    If you want to buy an image, or want to speak to me about future collaboration email me at sales@rickmcevoyphotography.co.uk.

    Rick McEvoy ABIPP – Photographer, writer, blogger

  • Santorini photography tips – what I have learned – Part 1

    I have been on a dedicated photography trip to Santorini. This fantastic trip has culminated in me producing a website called Photos of Santorini. And you have found it so welcome.

    In this series of two posts, titled Santorini Photography Tips, I will tell you everything that I have learned on my photographic trip to the Greek Island of Santorini. This is in addition to the 20 images and accompanying blog posts which are already on this website. And lets not forget my Big Fat Greek photo gallery!

    After reading this post (in two parts) you will be much better informed on what to expect from a photographic trip to Santorini, and also get some tips from me for photography trips to other places.

    About my new website Photos of Santorini

    I never thought that a photography trip to Santorini would result in me producing a brand new website dedicated to my Santorini photos but here we are!

    This post is the last post for now. I have already published some introductory posts which I wrote when I created this website. The bulk of the content is the 20 posts about the 20 Santorini photos which I completed yesterday.

    This is and the complete set of fully edited photos of Santorini which you can find in a single online gallery which I am going to call My Fat Big Greek Photo Gallery.

    This post is a summary of everything that I experienced and learned from my trip to Santorini.

    Planning at home

    I have to be honest here, I am not a big one for planning photography trips whilst I am at home. Of course I will do a bit of research to find out if there is enough of interest in a location for me to photograph, but once I have established that the location is interesting enough for me to photograph is my planning pretty much done!

    I do not search through Google looking at photos that others have already taken. I don’t want to know what other people have photographed. This way I do not arrive there with any pre-conceptions, I don’t have other peoples work cluttering my head.

    I get to a location knowing the general landscape and topography and take it from there. I like to find things myself, on foot, or in a car.

    And that is pretty much what I did in Santorini – I spent a lot of time finding things to take photos of.

    Now I am not saying that this is the best way to approach photographing a new location, but it works for me and makes it more of an adventure. I am sure I am missing out on some of the headline glamour shots but I am fine with that. My way I might find something that is less photographed and have more interest.

    There is of course a downside to this – I might unwittingly stumble on some headline photography locations and photograph them to within an inch of their lives.

    But I am happy to take that risk!

    There is one thing that I do ascertain before I go anywhere though – the time of sunrise and sunset, and also how the sun traverses from one to the other in relation to the location I am going to.

    Gear

    For a trip like this I travel light. This is through choice. Bearing in mind that I am on a photographic journey of discovery on foot the last thing I want to do is be loaded down with a bag full of gear.

    I used to carry everything in one single, large Lowepro bag. I could barely lift the bag onto my shoulders, and adding a tripod to the outside of the bag made it even more of a nightmare, making the bag heavier and more unwieldy.

    Getting anything out of my bag was too much trouble.

    But still I had all my gear with me ha!!!

    It got to the point where I first stopped using my tripod, and then actually stopped taking my tripod with me at all, leaving it in the boot my car

    And I used very little of the gear that I was actually carrying.

    That was some time ago, and a number of foreign trips have forced me to change my ways. That and of course working on live construction sites where I need to be lightweight and nimble on my feet.

    And the realisation that I was being quite stupid – that particular penny needed to drop.

    Now I restrict myself to a single backpack, the Peak Design Everyday Backpack. And the 20 litre one at that – not the larger 30 litre one. This is not only my camera bag for photography trips but also my hand luggage for getting to and from these foreign locations.

    Peak Design Everyday Backpack on the Santorini caldera
    Peak Design Everyday Backpack on the Santorini caldera

    For the getting there and back bit I put some of the heavier stuff in my hold luggage, which gives me room for the inevitable airport/ plane purchases of newspapers I don’t read, crisps, snacks, small bottles of wine and over-processed sandwiches.

    And of course smellies and discounted jewellery products on the plane.

    When I am out and about taking photos I have just that bag with me. This bag takes a drinks bottle on one outside pocket and my tripod on the other.

    And that is it.

    Lightweight, nimble, minimalist. I only take essential things that I use on every trip. In one small lightweight backpack.

    My gear page – and full time for disclosure

    I have a separate page with all my gear listed here – there are affiliate links to all my gear, some to Amazon and the Peak Design one goes back to the good folks at Peak Design so if you use any of these links and buy something I get a commission.

    Luggage

    I am talking non-photography stuff here. And the point I want to make here is what exactly?

    Well first thing is that stuff that is not breakable and heavy goes in my checked luggage. That and of course my Leatherman (aka potential weapon as far as airport security are concerned), lens cleaning fluid (i.e. liquid over 100ml) and my tripod. Yes that has a big impact on my luggage capacity. And the shoes I pack. More on that later….

    But there is something else. I went to Santorini in April. Surely the weather is lovely on the Greek Island of Santorini in April?

    Yes of course it is, but not that warm on top of the caldera at 4am!

    When you are going on a photography trip you need to pack for the weather at times when sensible people are tucked up in bed. The times when you will be sat on top of a hill in the darkness not moving for potentially hours at a time.

    For my photography trip to Santorini this consisted of a fleece, actual walking trousers and two red hats (of varying thicknesses – more on that later as well).

    Packing

    Breakables in my hand luggage, the rest in my hold luggage.

    I don’t have a packing list, but I should do – that will be seriously useful. I might print off my gear list and use that as my packing list. This will serve two purposes.

    1. I will not forget anything.
    2. I will not pack anything that is not on the packing list.

    I need to remember to add some non-photography stuff to my packing list, if I had one that is!

    Getting there

    Easy enough. Fly from Gatwick to Santorini, taxi from the airport to the hotel, job done. No dramas on the way or the way back. Everything was on time, nothing got lost, and the flight was absolutely fine. Flight time from Gatwick just under four hours. Airport transfer less than half an hour.

    Nice and easy.

    Where we stopped – the most excellent Kasimatis Suites in Imerovigli.

    We stopped at the Kasimatis Suites in Imerovigli. My wonderful wife spent a lot of time choosing this excellent hotel, with amazing views of the caldera from the hotel itself. I will write a separate post about the hotel (when they get back to me with some info that is), but I need to tell you this now.

    If you are looking for a hotel where you can photograph stunning sunrises and stunning sunsets from the actual hotel itself then this is a great place to stay.

    I actually have a couple of photos on this website taken at the hotel – that is how good the location and views were.

    And one of those photos was taken from inside our room. And another photo was an interesting shot of the hotel reception – yep I have managed to shoehorn architectural photography into this website!

    At the hotel you can get breakfast delivered to your room on a tray which was great. I would get back from my sunset shoot, have a cuppa with my wife and wait for breakfast to be delivered – what a fantastic way to work!!

    A great location, lovely rooms, great service – Kasimatis Suites in Imerovigli is highly recommended by both of us and we look forward to going back there.

    Locations I photographed

    Well everywhere we went was on foot from our hotel in Imerovigli.

    Here is the map from Lightroom which shows where most of the images featured on this website were photographed. I say most as there were a couple of times here the GPS on my Canon 6D did not work. But you get the idea of how little of the island I actually covered.

    Sunrise on Santorini

    This is what I am here for. I love my sunrises. I prefer sunrise to sunsets to be honest.

    Normally when I am photographing sunrise I am on my own and have time to enjoy things. The downside is of course that I have to get up at stupid ‘o’clock in the morning.

    When we were in Santorini I used to set the alarm for 4am, with my camera bag packed the night before ready to go. This is a case of preparation – I need to get up, get myself sorted and out of the house without waking anyone up.

    It is colder before sunrise so you need clothing to suit, and also sunglasses that are effective enough to block that directional morning light whilst enabling you to read the tiny numbers on the camera. Difficult at my age..

    And what were the sunrises like on Santorini?

    Sunrise on Santorini was simply spectacular. Each day was different.

    The first morning there was low cloud down below us. I walked down the steps at the hotel to the lowest rooms, and the cloud was right below me. You can read about this photo in the post Fantastic Santorini photography – low cloud at sunrise.

    Other sunrises featured clear skies and sun, my least preferred, and on the other side of the island varying clouds and lighting, which you can read about in this post Probably one of the best Santorini photo locations?.

    Santorini sunsets – how good are they?

    I guess it depends where they are – you need to find the best sunset spots, which is the easiest thing in the world to do when you are stopping at the Kasimatis Suites – you are already there!

    I even took this photo in the post Where can I see the sunset in Santorini from my hotel room? from our hotel room so good was the room we chose. When I say we I mean Nickie, my wife – the whole trip was down to her. And what a choice of hotel!

    As I said I prefer sunrises to sunsets. Sunsets tend to happen at a more anti-social time than sunrises, at the time of day when I am away that I would quite like a beer!

    Talking of which I did take some sunset shots whilst having a beer at the hotel which was lovely.

    From Kasimatis Suites we got direct views of the sun setting directly above Thirasia on the other side of the caldera.

    Santorini sunsets are pretty famous, and much photographed. I have tried to create some different sunset images.

    And they are much warmer than sunrises.

    Gear list.

    This is the page with my gear list.

    And this is all the gear with my new Peak Design Everyday Backpack.

    Nope – no spare camera body. A calculated risk as I have only ever had one body fail on me ever, and that was of my own doing. Even when I dropped my Canon 6D on a rock hard floor in a National Trust office it still worked fine.

    So as long as I don’t drop my camera I should be fine…..

    Image capture – how I take my travel photography images.

    I use a very similar technique with my travel photography work that I have refined over my years as an architectural photographer.

    The principles are the same for both architectural and travel photography – the subject is not moving, there are no people and I am on my own with time to create the compositions I want.

    These are some of the key features of my image capture process

    1. I always use a tripod unless I am in a built up area or there just isn’t room.
    2. I only use either the 24-105mm lens or the 17-40 and 70-200mm lenses.
    3. I tend to shoot as wide as the lens allows. Top tip – I sometimes stick gaffer tape on my Canon 17-40mm lens so it stays at 17mm.
    4. I use back-button focus, and normally focus 1/3rd of the way into my composition.
    5. I use a loupe viewer so I can see the screen.
    6. I use Live View and the viewfinder to make my composition – I alternate between the two.
    7. I take time getting the composition I want. If I have time that is.
    8. I may take one photo of a composition, or lots if the light is changing, clouds moving or the sun rising or setting.
    9. I compose so there is no/ minimal cropping.
    10. I walk around a lot when I get to somewhere interesting to find things to photograph.

    That should have been titled my Top 10 Santorini Travel Photography Tips! Ok it just has done.

    These are some of the camera settings that I use on my Canon 6D.

    1. AV Mode – I use AV Mode, meaning all I need to do is select the aperture, normally the only variable I am interested in.
    2. ISO 100.
    3. F8 – F16 unless there is something specific that requires something else.
    4. RAW image capture – I shoot in RAW and convert to Jpeg later.
    5. Auto-bracketing – I take three bracketed images – the first is the correct exposure, the second two stops under-exposed and last one two stops over exposed. I merge these together afterwards in Lightroom.
    6. GPS on.
    7. Focus Mode – one shot.
    8. Drive Mode – continuous.
    9. Back button focus – I have separated focus and metering.
    10. I use the self-timer on my Canon 6D.

    I use these settings all the time, meaning that I get not only a consistent set of images but of equal importance to me I don’t need to worry about my camera at all – all I need to think about is the aperture (if it is not F8) and where I focus – the rest is pretty much all sorted for me.

    Leaving me to concentrate on the most important thing, the composition.

    Do I use any filters?

    All I have with me these days is my Lee Big Stopper ND filter and a circular polarising filter.

    The Lee Big Stopper is a beast of a filter, giving me a 10-stop reduction in light passing through to the sensor. I use this mainly for photographing water. 10 stops gives me a much slower shutter speed which means I can get that lovely silky flat water, and variations on this.

    I can also get movement in clouds.

    And the best thing of all is that I can do this in broad daylight – outstanding.

    I also have circular polariser that I rarely use these days to be honest. All my other filters are in a box in my garage.

    Protecting my lenses

    I do not use protective filters on my lenses – why would I? Why spend hundreds and more pounds on a camera lens and then stick a £50 filter on the front of it?

    I have never damaged the front surface of a lens. I always have the lens hood on – that is the best protection for the front element in my opinion.

    And I always put the lens cap on if I am not taking photos.

    These two things have kept my lenses front elements safe and intact for a long time now.

    And I hope that in writing this I am not tempting fate. I have just told my Tassimo coffee machine that after the last pack of coffee pods it is being replaced with a cafetiere (yes I do really talk to kitchen appliances). It responded by spewing coffee all over the place!!

    Why do I do HDR image capture?

    Simple. There is HDR which people like myself practice, and then there is the over processed HDR that looks all false and horrible. You know the things I mean – all over saturated with grungy textures and halos all over the shop.

    I take three bracketed images, which I merge together in Lightroom. All this is doing is adding the extra bits of data in the scene that my Canon 6D cannot capture in a single image.

    There is no trickery to this – that is all that is happening.

    And I have to be honest doing this means I don’t have to think about the camera settings for the image capture as most things are covered.

    You might call this lazy, and you might be right, but I am much more interested in concentrating on what I am taking photos of rather than fiddling with my camera settings.

    Back-button focus.

    A wonderful thing this is. What does back-button focus mean?

    With my Canon 6D in its default setting, you press the shutter button and the camera takes the meter reading and focuses where the camera is told to focus. Now my Canon 6D only has 11 focus points so it is quite straightforward.

    I have changed the operation of the shutter release button to activate the shutter only – there is a button on the back of the Canon 6D that I use for focus. I like to focus first, and then take photos as and when. I don’t want to be focussing every shot, as with a sunrise I could take a sequence of 10, 20, 30 or more images, and I want the focus point to be the same for all of the image captures.

    AV Mode

    I use AV Mode on my Canon 6D to keep things simple. I take most of my photos on a tripod, only hand holding in bright sunshine, when I am on the move or when there is no room for a tripod, like on those grey painted footpaths that meander through the white buildings of Santorini.

    As I use my tripod I don’t really need to worry about the shutter speed unless it is particularly windy and trees and clouds are moving quickly.

    I am interested of course in the aperture to make sure I get the depth of field I want for the composition, so I change the aperture for each shot and the shutter is sorted for me by the camera.

    Lenses

    I have three lenses for travel photography. I tend to use the Canon 17–40mm lens the most, and change to the Canon 24-105mm lens when I am walking around places. The Canon 70–200 F4 L lens I use as and when needed.

    I sometimes go on trips with just my Canon 24-105mm F4 L lens, but for my photographic trip to Santorini I took all three lenses providing me with a back up in case one lens failed.

    And that is part 1 of my Santorini Photography Tips done – click here for part 2.

    One last thing

    If you want to buy an image, or want to speak to me about future collaboration email me at sales@rickmcevoyphotography.co.uk.

    Rick McEvoy ABIPP – Photographer, writer, blogger

  • Imerovigli or Oia sunset – get the best of both my way

    Imerovigli or Oia sunset – get the best of both my way

    A stunning sunset photo from Santorini taken from the cliffs of Imerovigli looking towards the town of Oia. A gorgeous glowing sunset and the lights of the town all add to this stunning scene.

    This is the last image that I will talk about on my new website Photos of Santorini. I hope you have enjoyed seeing and reading about my photos.

    Which is the best – Oia or Imerovigli sunset? I say the sunset view of Oia from Imerovigli – its a great view which is one of my favourite sunset views of Santorini. Why choose when you look at one from the other?

    On this particular evening just look what was in front of me – just stunning.

    And this is why I love Santorini so much – quite simply a stunning Greek Island with stunnig views.

    One of the things that I have noticed is that in 5 days I got a great number of images that I could use commercially – well over a hundred. On a travel photogrpahy shoot I am normally happy to get one image that I will use per shoot, so to get so many in 5 days is just fantastic for me.

    And all this makes me want to do is go back to Santorini and photograph the rest of this wonderful Greek Island.

    Why do I like this photo so much?

    Santorini is renowned for its views, and for it’s sunsets. And sunset colours don’t get much better than this.

    In this photo we are looking at the small town of Oia, which is perched on the end of the caldera just before it drops into the Southern Agean Sea.

    In the background you can see Sikinos and Ios, two small Greek Islands that I would love to visit, as well as some even smaller islands which don’t even have names (as far as I can tell).

    I love the sunset colours in this image, with a range from magenta to light orange with lots of different shades in the middle.

    You can see the lights of the buildings on the town of Oia, as well as Oia Port down to the right.

    There is a solitary boat going round the headland – is that a sunset crouse or a fishing boat? Well will never know.

    And in the background amongst all those lovely colours other islands dotted around the Southern Agean Sea.

    Such a lovely scene which I was very fortunate to witness and photograph.

    How did I decide on this composition?

    Well that was easy enough – it was sat there in front of me. The caldera entering the photo bottom right and the islands above.

    I have put the horizon pretty much in the middle of the image. This was a conscious thing, and is a big no no in photogrpahy – never put the horizon in the middle as it cuts an image in two.

    This is one of the basic rules of photography.

    Which it is good to break once in a while.

    Why did I do this?

    Simple – I wanted as much of the gradation of the orange in the sky as possible – that is one of the primary elements of this image.

    And does anyone care about the rules of photography other than other photographers?

    Of course not. No one cares. And I am not taking photos for other photogrpahers. And when I take photos I am thinking about the composition and not the rules of photography.

    So there – thats the photography world told!

    Where was the photo taken?

    Where the number 7 is on the yellow tab.

    Oia Santorini sunset Lightroom Map 24102018

    Basically this yellow tab is the location of the lovely Kasimatis Suites, the hotel we were staying in.

    What time of day was the photo taken?

    18:23. Yep an actual sunset. And this image was part of a sequence of images capturing the entire sunset for at least an hour.

    What photography gear did I use to get the shot

    • Beer. I was at the hotel so had a beer on the go – most excellent.
    • Canon 6D
    • Canon 70 – 200mm F4 L Lens (focal length used 70mm)
    • Manfrotto 190 Go tripod with geared head
    • Peak Design Everyday Backpack
    • Loupe Viewer
    • No hat required (I need a cap)
    • Oakley sunglasses
    • Flip flops

    What camera settings did I use?

    • Aperture F8
    • Shutter speeds 1 second, 1/4 second and 4 seconds.
    • ISO 400
    • Back-button focus
    • Focal length 70mm
    • AV Mode
    • 10 second self-timer
    • RAW format

    I will say this again. F8 is my go to aperture. F8 is the sweet spot on my Canon 70-200mm lens, and gives me the sharpest images. And also for a shot like this depth of field is less of a worry so this was just fine.

    And look at the exposure times. 1 second, 1/4 second, 4 seconds. I stuck with an ISO of 400 to keep the noise in the image down, giving me longer shutter speeds. But as I was taking photos on a study tripod on solid ground not a problem. No blur in the image (apart from the boat coming round the headland that is).

    One interesting fact about the image.

    I took 80 photos in total during this sunset, starting at 4:54pm and working through to 6:29pm. This was how long the sunset lasted, and also how long I had with that great light looking out from the hotel and surrounding locations in Imerovigli to the west and into the lovely lovely setting sun.

    And, obviously, this was my favourite photo from that sequence.

    Is there a behind the scenes video of this shoot?

    No.

    How did I process the image?

    This is the RAW image – check out that sensor spot to the right – that has to go (which of course it did). And look how dull flat and lifelss the RAW image is. But all the base data is there that I need to create the photo at the top of this post.

    Oia sunset Santorini RAW file 24102018

    And this is the image having been processed in Lightroom (I know the dust sensor spot is still there).

    Oia Santorini sunset Lightroom Develop 24102018

    You can see most of the processing that I carried out to this image in the screenshot.And you can also see that the reproduction of the colours is realistic – I have just emphasised what was there, rather than doing any funky Photoshop trickery. That is not what I am about.

    Talking of Photoshop this image was finished off in Photoshop removing that hideous sensor spot and any other distractions and errors.

    What could I have done to improve the image?

    I didn’t like the wider composition. Could I have done a tighter crop? Well lets see.

    A stunning sunset photo from Santorini. Taken from the cliffs of Imerovigli looking towards the town of Oia. A gorgeous glowing sunset and lights of the town all add to this stunning scene. Santorini, Greece.

    Not sure if that is better or not. Actually it is fine either way – sometimes a change in composition can make a difference, sometimes not so much.

    And what are my thoughts on this image?

    Well doing that tighter crop got me thinking, which is never a good thing.

    Either way I love the sunset colours and the depth the other islands give this image.

    A great way for me to finish my sequence of photos of Santorini.

    Enough of me – what do you think of this image?

    One last time (for now) – what do you think of this sunset view of Oia from Imerovigli?

    And do you prefer the cropped imaged?

    Please let me know – I love hearing what you all think of my photographs.

    And I hope that you have enjoyed this post and my other posts all about my photos of Santorini.

    Now that my work here is nearly done please check out my other travel photography website Paxos Travel Guide, which should be completed by the end of December 2018.


    One last thing

    If you want to buy this image, or want to speak to me about future collaboration email me at sales@rickmcevoyphotography.co.uk.

    Rick McEvoy ABIPP – Photographer, writer, blogger

  • Fantastic Santorini photography – low cloud at sunrise

    Fantastic Santorini photography – low cloud at sunrise

    Sunrise with clouds below the caldera photographed from Kasimatis Suites. Sunrise and sunset can be different every day, like this surreal sunrise with a blanket of cloud just below the hotel in Imerovigli on the Greek Island of Santorini

    This is one of my favourite images of Santorini.

    When I say fantastic photography I need to explain – this is not me bigging myself up – I just needed to get the keyword Santorini photography into one blog post – no point trying to hide this is there?

    In all seriousness I really do love this photo of a weather phenomenon which you can’t get anywhere – you need certain conditions to get clouds right below your hotel like I saw this morning!

    This is still one of my favourite photos of Santorini.

    Why do I like this photo so much?

    I have never seen such a scene before. This was what greeted us on the first morning.

    A blanket of cloud immediately below us. Now I had moved around quite a lot taking lots of photos of all this good stuff before returning to the hotel to get this great photo with that dense layer of grey morning clouds with the sunrise immediately above.

    I love the contrast of the colours and the uniqueness of this scene.

    And the fact that it was taken at the actual hotel that we stayed at is special to me. Special as my wife spent a lot of time choosing this exact hotel for my photographic trip to Santorini.

    And what a great choice of hotel she came up with!

    How did I decide on this composition?

    This was the view from the back of the hotel, the Kasimatis Suites.

    Kasimatis Suites at sunrise with low cloud IMG_8316

    I went down to the steps at the bottom of the hotel, below which there is nothing but rocks and the sea.

    And on this day clouds.

    The scene did not work as well for me – the composition from there was not as interesting.

    I settled on the view you can see in the main image on this post – this was telling the story of a morning at a hotel on the Greek Island of Santorini. A sunrise morning with low clouds, which is not unique but hardly a daily occurrence either.

    I love the contrast between the hardness of the white buildings and the softness of the grey clouds, all topped off by that lovely sunrise warmth which has not yet reached down to the clouds below.

    Where was the photo taken?

    At the Kasimatis Suites in Imerovigli on the Greek Island of Santorini. I have to say this as some people will read this one blog posts on its own so I have to explain in enough detail these things on every post!

    Look at the extract from Lightroom. It is so detailed you can see the swimming pool, and exactly where I took this photo!

    What time of day was the photo taken?

    4:53. Yep that early.

    What photography gear did I use to get the shot?

    • Canon 6D
    • Canon 24-105mm F4 L Lens
    • Manfrotto 190 Go tripod with geared head
    • Peak Design Everyday Backpack
    • Loupe Viewer
    • Red hat
    • Oakley sunglasses
    • Red shoes – fresh on!
    • This was pre-morning coffee!

    What camera settings did I use?

    • Aperture F8
    • Shutter speeds 1/250th second, 1/1000th second and 1/60th second.
    • ISO 100
    • Back-button focus
    • Focal length 24mm
    • AV Mode
    • 10 second self-timer
    • RAW format

    One interesting fact about the image.

    It is taken just down from our room at the Kasimatis Suites. The steps down were to some of the other rooms in the hotel.

    And I had not even had a coffee – it was a case of wake up and get out there.

    OK there is one more fact – I was woken by my wife who was awake before me and opened the curtains to be greeted with this amazing scene!

    Is there a behind the scenes video of this shoot?

    No. There was much too much going on for that! Which I will be completely honest with you is a regret.

    I would have loved to have some videos of this bank of morning cloud, but I don’t have any. Another reason to go back to Santorini then.

    Having said that there is this video taken from a slightly different viewpoint which gives you an idea of what the scene looked like, and sounded like!

    How did I process the image?

    This one took a while to produce in Lightroom. First job was to merge the three bracketed images together in Lightroom to form a new Dng file.

    Next job was to get the verticals and horizontals correct. After that I always do white balance.

    This gives me a technically accurate starting point for the more creative processing.

    Most of the processing was done in the Basic and HSL panels in Lightroom. There was quite a bit of cleaning up to do, removing blemishes, dust spots and random bits of lights and stuff in the building that were detracting from the scene.

    What could I have done to improve the image?

    Hmmm. Not sure to be honest.

    I need to get rid of that bit of wall bottom right I have only just noticed this writing this section.

    And that is the point of me asking this question – it forces me to look at the images I have created and see what is in there that I dont like, and think about ways that I could have created a better image.

    This is something I recommend everyone does who wants to Improve their pototgraphy – critique your photos yourself and even better get someone else to do this for you.

    Not you parents, husband, wife, children or best friend. They will just say that they think your photos are great even if they are rubbish!

    No ask someone who knows what they are talking about who will be honest with you.

    My first critique as with a Hasselblad Master who was my BIPP mentor no less!

    Look at a your photos – study them. I recommend once you have processed a set of images leave them for a decent length of time and then come back to them and give yourself time to look at them and study them properly – you will be amazed what you will find that has always been there that you never noticed before like that bit of wall bottom right!

    And what are my thoughts on this image?

    I have never seen weather like this. I have never looked down on clouds from my hotel with a big bright band of orange sunrise light above the clouds.

    This scene was surreal, and a morning that I will not forget in a long time.

    I am happy that this image brings back those memories of that morning – this is why I love photography so much.

    And also why I want to go back to wonderful Santorini. Then again there are so many other places on this wonderful planet of ours.

    Enough of me – what do you think of this image?

    Have you ever seen such a lovely sunrise photo on Santorini?

    Am I right describing this as fantastic Santorini photography??

    Let me know what you think, even if it is to tell me that I have been speaking a load of rubbish!

    Talking of my next venture, now that I am getting near to the end of the creation of this website I would like to tell you about my next website which I will be working on next week called Paxos Travel Guide. Yes I am staying in Greece and producing another travel website, this one with slightly different content to photos of Santorini.

    One last thing

    If you want to buy this image, or want to speak to me about future collaboration email me at sales@rickmcevoyphotography.co.uk.

    Rick McEvoy ABIPP – Photographer, writer, blogger


  • What is the best view from Oia? Check out my favourite here

    What is the best view from Oia? Check out my favourite here

    This is the view looking back towards Imerovigli and Fira from the end of the caldera at Oia just before the sun sets on another day in Santorini

    There are many great views on the walk from Imerovigli along the top of the caldera to Oia at the end of the island.

    But what is the best view from Oia? This is my favourite view from Oia looking back towards Imerovigli and over to the right Fira, with a bit of Oia bathed in the early evening sunlight.

    Why do I like this photo so much?

    I know I have said this quite a few times but I am loving the fact that the images I am publishing on this website are not your typical photos of Santorini. Sorry – that was a completely conincidental (and indeed unnecessary) use of the keyword which is in the URL for this website.

    Sorry where was I? Oh yes, why do I like this photo of the view from Oia looking towards Omervigli and Fira perched on the top of the mass of the Santorini Caldera so much?

    Well it is a different viewpoint. And I find that this is quite a common thong with me – quite a lot of the photos that I have published are not images that are displayed that often.

    This is not a conscious thing. Well that is not strictly true, not going to the photo locations on Santorini which are the most popoluar ones is a conscious decision.

    As is the decision not to study the photos others have taken of Santorini – I like to get to a new location with a clear mind and not other peoples images cluttering my vision.

    Publishing Santorini photos which are from different viewpoints is just the way things have happened – all I have done is picked the 20 photos that I took in Santorini which I like the most and which represent me and my photography right now.

    No there is no science attached to this – these are just photos that I like.

    Back to this image.

    I love the white buildings sat on top of the caldera – the relative scales of the two tell a story. And I also love that raking golden pre-sunset light warming the face of the caldera.

    And finally getting a little bit of Oia in the foreground gives the image a sense of depth and places the three towns relative to each other.

    How did I decide on this composition?

    This is the panoramic view from Oia taken on my iPhone.

    I wanted to get a little bit of Oia in the foreground, which would give depth and scale to the image. I wanted Oia, Imerovigli and Fira in the same shot.

    And I wanted the view looking back from Oia to the main body of the caldera and the main part of the Greek Island of Santorini.

    The sky was the sky on the day and time that I took that image – you can’t have perfect white fluffy clouds exactly as you want them every time you take a photo.

    This was a relatively straightforward composition, I just had to get as far from the main footpath as possible to eliminate all that stuff that you can see in the panoramic image.

    Where was the photo taken?

    The photo was taken from Oia looking back towards Imerovigli. We had walked that afternoon all the way from Imerovigli, which was a spectacular and very enjoyable experience.

    What time of day was the photo taken?

    5:02pm. This photo was taken at the end of the walk from Imerovigli to Oia. This was very much pre-drinks time.

    What photography gear did I use to get the shot?

    • Canon 6D
    • Canon 24 – 105mm F4 L Lens
    • Hanheld – my Manfrotto 190 Go tripod with geared head was in my bag. Yes I carried it all the way from Imerovigli to Oia.
    • Peak Design Everyday Backpack
    • Loupe Viewer
    • No red hat – by now I needed a cap (but did not have one)
    • Oakley sunglasses (which by this time felt like they had been welded to my face)
    • Red shoes (feet destroyed)
    • Pre-beer photo – might have been a bit rushed!

    What camera settings did I use?

    • Aperture F22
    • Shutter speeds 1/160th second, 1/640th second and 1/40th second.
    • ISO 400
    • Back-button focus
    • Focal length 40mm
    • AV Mode
    • 10 second self-timer
    • RAW format

    40mm focal length! Now that is unusual for me and tells me that the composition was a very deliberate act to go with such a specific focal length.

    Now I know that F22 gives the maximum depth of field but F16 should have been fine with that composition at a focal length of 40mm.

    One interesting fact about the image.

    It was taken at the end of a walk from Imerovigli. We were going to walk back but there is an excellent bus service that took us both back to Imerovigli for less then 10 euros. And this bus trip gave us a great view of the eastern coast of the island.

    Sorry not really that interesting a fact was it?

    Erm – I took this photo from near the path from Imerovigli to Oia. I had to get off the main path to get this view.

    And there was a really good bar on the opposite side of the footpath.

    I had a beer and some nuts.

    I think I’d better stop here…

    Is there a behind the scenes video of this shoot?

    No. All I have is this iPhone photo of a simlar view. Not quite the same is it.

    How did I process the image?

    This is the processing that I did in Lightroom to the file created by merging the three bracketed images.

    Most of the processing for this image was done in the basic and HSL panels in Lightroom as you can see above.

    Getting the white balance correct was crucial to the success of this image. To do this I found a piece of cloud that was a neutral grey, containing similar values of red, green and blue.

    I used the targtetted adjustment tool to make a custom white balance selection which gave the image the correct amount ot warmth.

    All I then needed to do in Photoshop was remove dust sensor spots and an ugly building bottom left which was spoiling the corner (in the shadows I hasted to add!).

    But that kind of removal is fair enough to me.

    And what are my thoughts on this image?

    I like this image as it shows the relative locations of Oia, Imerovigli and Santorini.

    And it also gives a great view of those famous white buildings of Santorini perched on the top of the caldera of.

    The late rafternoon sunlight makes this image, giving a warm glow and a lovely contrast to the lights and shadows.

    Finally, what could I have done to improve the image?

    Those shadows bottom right bother me. OK I meant bottom left.

    I wish they weren’t there. I couldn’t crop in, but I could remove them in Photoshop.

    And that is where there is a question – the shadows were there when I was pointing my camera at that particular scene – should I remove them or not?

    Enough from me – what do you think of this image?

    Yes you have heard enough from me – please give me your thoughts on this photo of the view from Oia looking towards Imerovigli and Fira on the Greek Island of Santorini.

    And do you think it is ok to remove the shadows bottom left to make the image nicer?

    One last thing

    If you want to buy this image, or want to speak to me about future collaboration email me at sales@rickmcevoyphotography.co.uk.

    Rick McEvoy ABIPP – Photographer, writer, blogger


  • Images of Santorini – windmill at sunrise in Imerovigli

    Images of Santorini – windmill at sunrise in Imerovigli

    A picture taken as the sun is rising to the east with the cold blue light in the shade. An isolated old windmill is the first thing to be warmed by the morning sun from the East giving the building shape and form. This is a classic stunning sunrise view of Santorini

    I have tried to capture some great scenes that you can find in Santorini. For me this is one of them.

    Out of all the images of Santorini that I have seen I have never seen this view of one of the former windmills illuminated by the sunrise. This photo was taken in Imerovigli.

    Why do I like this photo so much?

    Simple. It is a fantastic Santorini sunrise scene. Sunrise on Santorini is always an experience, and this day was no exception. I took this photo as the sun was rising over to the right, which is the east.

    In this photo I am looking to the north, so I have the sun rising to the right (east), and the cold blue pre-sunrise light to the left (west), and the bottom of the view in the shadows.

    I have never seen this before coming to Santorini, where there are two different colour temperatures of light in one image.

    And add the low level clouds which were being blown over the caldera and we have a really distinctive scene full of atmosphere, mood and natural wonder.

    And then there is that one building, the former windmill, standing proudly above everything else being, warmed by the first rays of sunshine as a new day unfolds on the wonderful Greek Island of Santorini.

    Blimey – that was very poetic of me!!

    How did I decide on this composition?

    Well I had been all over the place photographing the endlessly varying scenes that morning with those surreal low level clouds constantly moving and changing.

    This is the windmill close up, photographed on my iPhone that morning.

    And this is the view from the other side of Kasimatis Suites, a panoramic photo taken with my iPhone.

    How did I decide on the composition?

    Well to be honest sometimes it is a case of walking around with your eyes fully open and aware of everything that is going on, watching what the light is doing, and on a morning like this what the fast moving cloud is up to.

    Having walked around I found a view that I liked, which was this one.

    I set up my Manfrotto tripod and placed my Canon 6D on it, and then I waited.

    I was waiting for two things.

    Firstly for the sun to get high enough after actual sunrise so the rear of the windmill, the eastern facing bit, was lit by the wonderful morning sun. And nothing else.

    You can see a couple of glimpses of sunlight on buildings lower down which add points of interest. Or distractions – depends how you look at it. But I left them in as they were their.

    Wish I’d never mentioned them now!

    Once the sun was where I wanted it I waited for the clouds to look their most dramatic – I couldn’t wait too long of course or the sun would have been higher and I would have lost the effect I was after.

    And I was interested to see that I used an 80mm focal length, which suggests quite a considered composition.

    Where was the photo taken?

    Right here where the yellow tab is. I am so glad that my Canon 6D has GPS built-in!

    What time of day was the photo taken?

    5:54am. And I had been up and about for some time capturing the magical scenes the morning clouds add to sunrise on Santorini.

    What photography gear did I use to get the shot?

    • Canon 6D
    • Canon 24-105mm F4 L Lens (focal length used 80mm)
    • Manfrotto 190 Go tripod with geared head
    • Peak Design Everyday Backpack
    • Loupe Viewer
    • Red hat – I was in the shade when I took this so it was still cold.
    • Oakley sunglasses
    • Red shoes
    • Still burping from Pepsi Max!

    What camera settings did I use?

    • Aperture F16
    • Shutter speeds 1/200th second, 1/800th second and 1/50th second.
    • ISO 200
    • Back-button focus
    • Focal length 80mm
    • AV Mode
    • 10 second self-timer
    • RAW format

    80mm focal length interests.me. Why is that? Because I did not use either end of the zoom range on my Canon 70-200mm lens.

    No I zoomed in a little bit to get the composition I wanted. And that tells me that I was thinking about my composition properly and that pleases me greatly.

    One interesting fact about the image.

    The cloud was moving. I had walked miles. But for this photo I had time to wait for the moment. It was a period of calm in the midst of a manic morning capturing the constantly changing scenes in front of me.

    Is there a behind the scenes video of this shoot?

    No. I was far too busy trying to capture this fantastic morning cloud.

    Seriously the cloud was moving so fast all I could do was keep looking, moving and taking photos.

    And it was one of the best mornings I experienced on Santorini – a truly memorable experience for me with a photo which I absolutely love.

    How did I process the image?

    This is nother bracketed set of three images merged together in Lightroom.

    This is a screenshot of the processing that I carried out in Lightroom. This shows most of the work that I did to this image, which to be honest was not that much

    After processing in Lightroom I had to go into Photoshop to remove a few sensor dust spots from the light part of the sky – they aren’t that obvious amongst dark grey clouds.

    One point – the compositions as a conscious one using a focal length of 80mm, and the image has not been cropped – this is quite literally what I saw when I was there.

    And that was that image all done and dusted.

    What could I have done to improve the image?

    I could have removed those glimpses of sun on the tops of the buildings lower down the caldera I guess.

    And I could have added a moon into the scene, but these are Photoshop things that whilst they might improve the image are not things that I want to do.

    This is what I saw enhancaed naturally and realistically in Lightroom and cleaned up in Photoshop.

    So thats you told!

    A tighter composition with the windmill, clouds and darkness could have been interesting, but then again I could do that by cropping in Lightroom.

    So when I say what could I have done to improve an image quite often the answer is not that but an alternative composition which would have given a different end result.

    And what are my thoughts on this image?

    If you read my introduction to this image in the “Why do I like this photo so much?” section then you might have gathered that my poetic recollection of taking this image say sit all.

    This photo really takes me back to that moment, which is the most I can ask a photo to do for me.

    If a photo does this then I have achieved what I want.

    This is one of my favourite photos of Santorini. When I say that I mean favourite of the photos that I have taken, just in case you were thinking that I was purporting to have taken some of the best photos of Santorini!

    Far be it from me to say, but then again…..

    Enough of me – what do you think of this image?

    Do you like this image? Does this photo of one of those Santorini windmillls at sunrise make you want to be there?

    Let me know what you think please.

    One last thing

    If you want to buy this image, or want to speak to me about future collaboration email me at sales@rickmcevoyphotography.co.uk.

    Rick McEvoy ABIPP – Photographer, writer, blogger


  • Where to watch the sunrise on Santorini – let me tell you

    Where to watch the sunrise on Santorini – let me tell you

    The view looking to the east down the island from the caldera at sunrise showing the other side of the Greek Island of Santorini

    To watch the sunrise on Santorini you have to be in the right place. And at the right time of course.

    Where to watch the sunrise on Santorini? Simple. On the eastern edge of the caldera. Stay on the west and you will be waiting a while for the sun to rise over the land!

    And no I did not drive to this location, I got there after photographing the sunrise on my own two feet wearing my ridiculously packed red pumps.

    Have I shown you my red pumps yet?

    Here they are. Well one of them anyway. You get the idea. Stupid footwear choice for a photography trip I know. Red Moshulu pumps.

    Why do I like this photo so much?

    This is another less popular view of the sunrise on Santorini. This photo was taken from the side of the road from Imerovigli to Oia.

    You can see the road in this picture.

    More of that later. Sorry – I do digress from time to time. Back to why I like this picture of the sunrise on Santorini.

    It is the view down the island, on the flatter eastern side, with those three stunning natural colours, green, blue and orange.

    This was not in my original pick of 20 photos of Santorini, but after a rethink I edited this image and here it is.

    And I am delighted to have added this landscape photo of Santorini to this website. Funny I have not used the term landscape photo on this website up until now!

    How did I decide on this composition?

    You can see the panoramic view in the next section of the whole scene. The composition was framed by the road to the right, and the cloud top left which I now wish was not there.

    I excluded the sun from this composition as I wanted to the lovely sunrise colours to be the star of the show, without the (normally welcome) distraction of a big burst of bright sunshine.

    This composition is all about the layers of colours, starting with the lovely blue sky, the the band of orange from the sun that has just risen and the lush green of the fields of the eastern coast of Santorini.

    That was the story of this image. And as I have said not a view that I have seen before.

    Where was the photo taken?

    Well this is the view taken from the road with my iPhone. I love the ease with which the iPhone takes panoramic images, I just wish my main camera did the same as easily.

    And this is the location recorded by the GPS on my Canon 6D. It is the yellow tab on the map.

    What time of day was the photo taken?

    5.23am. Just after the sun had risen. I had captured the stunning sunrise that I had walked all the way to this location for, and sat on the wall thinking about where to go next. And as I sat there and looked at the view that was when I realised I didn’t need to move – I was already at the next photo location. Well I had to move off the road and down a bit.

    What photography gear did I use to get the shot?

    • Canon 6D
    • Canon 24-105mm F4 L Lens (focal length used 24mm)
    • Manfrotto 190 Go tripod with geared head
    • Peak Design Everyday Backpack – here it is sat on that volcanic ground.

    Peak Design Everyday Backpack on location in Santorini IMG_8372

    • Loupe Viewer
    • My thick red hat
    • Oakley sunglasses
    • Pepsi Max – although coffee would have been much better
    • Red shoes with thin socks (feet warming up by now)

    I know that I was moving from one place to another as I used my 24-105mm lens. When I am settled in a location I tend to put my 17-40mm lens on my Canon 6D, as this will give me a wider view with some latitude going to 40mm.

    I tend to shoot images using my 17-40mm lens at 17mm, and photos taken using my 24-105mm lens at 24mm, which I find quite interesting.

    And I dont crop images, normally with my photographs what you see is what I saw and captured.

    What camera settings did I use?

    • Aperture F16
    • Shutter speeds 1/40th second, 1/10th second and 1/160th second.
    • ISO 100
    • Back-button focus
    • AV Mode
    • 10 second self-timer
    • RAW format

    As usual I used the aperture I use other than F8 to get this shot – F16 – to get as much depth of field as possible. Did that make sense?

    What I meant was that I use F8 unless I need more depth of field and then I use F16.

    That was better second time around. Actual English.

    One interesting fact about the image.

    I have never seen this view before. Never. I guess people are only in this location of they are going somewhere else. It is just me who finds these obscure places and stops at them waiting for the sun to rise.

    Is there a behind the scenes video of this shoot?

    No – all I have is this still image taken on my iPhone showing my Canon 6D on my Manfrotto tripod.

    Look at the contrast between a straight photo taken on my iPhone 7 Plus (which has a pretty good camera I have to say) and the final image taken on my Canon 6D and processed in Lightroom and Photoshop.

    How did I process the image?

    Here are the Lightroom settings showing most of what I did to the file created by merging together the three bracketed shots.

    Nothing significant to report on the processing other than the fact that I used the HSL panels luminance and saturation tools to  naturally enhance those lovely sunrise colours.

    What could I have done to improve the image?

    Well looking at this image the cloud top left bothers me to be honest. Now that I have said that you are looking at it aren’t you?

    And before I said anything you hadn’t noticed had you?

    The problem is the cloud was there, which is why I included it in the image. Tell you what – I will remove the cloud and see which looks better.

    And what are my thoughts on this image?

    This was not an original choice, but I am delighted to have changed my mind and included this image on my website.

    I like this photo – it is all about those layers of colours, the lovely blue, orange and green complimented by the composition with the road on one side and the coastline on the other forming natural (ish) frames to the scene in the middle.

    Talking of thoughts of this image, a comment I made earlier made me think (this happens from time to time). The complete contrast in colours, exposure and tonal range from the Canon 6D shot to the iPhone shot is quite startling.

    And that thought is?

    I should take the exact same scene on my iPhone as well as on my Canon 6D and do a comparison.

    RAW image to RAW image and edited image to edited image.

    It will be fascinating to see how the two compare. But that is one for another time.

    Enough of me – what do you think of this image?

    And have you ever seen a photo of this view before? I haven’t.

    And a second specific question – do you prefer the photo of the sunrise on Santorini with or without the cloud?

    Please let me know, and also what you think of this photo and if you have any comments or questions on this post.

    One last thing

    If you want to buy this image, or want to speak to me about future collaboration email me at sales@rickmcevoyphotography.co.uk.

    Rick McEvoy ABIPP – Photographer, writer, blogger


    Rick McEvoy ABIPP – Photographer, writer, blogger

  • Where are the best places to see the sunrise in Santorini?

    Where are the best places to see the sunrise in Santorini?

    The view of sunrise with the church I N Ayiou Mapkou in the foreground which has spectacular views of the east of the lovely Greek Island of Santorini. In the background is the island of Anafi basking in the sunrise

    Santorini has stunning sunrises and sunsets. And the bits in-between are that bad either!

    But where are the best places to see the sunrise in Santorini? On top of the caldera is where – and one of my favourite places is the area around I N Ayiou Mapkou church which you can see in the photo on this post.

    Why do I like this photo so much?

    I like this photo for a number of reasons. Firstly, there is a lots going on in the sky, varying densities of cloud and a range of colours.

    I love the reflection of some of the sunrise colours from the sea.

    For some reason I really like the white cloud central to the image, floating above the church which is barely visibility in the pre-sunrise light.

    And if you look to the right you can just see the famous white buildings of Santorini just being illuminated by the first light of a new day.

    And lets not forget the island of Anafi just visibile on the horizon peeping out above the morning mist.

    Most of all though it is the feeling of this photo that I like – it really is this dark on the Santorini Caldera before sunrise, and I don’t remember seeing that many sunrise photos that convey this mood and feel, which to me is natural and reminds me what it as like being there.

    How did I decide on this composition?

    I had been to this location the day before, and had a pretty good idea of the composition I was looking for.

    I set up my camera in pretty much complete darkness, as the cloud cover completely blocked out the moonlight.

    I composed using the viewfinder and Live View. Although I have to say I prefer the viewfinder when it is so dark as I find the LCD screen affects my vision – I get used to the darkness and my eyes adjust.

    It was a case of framing the church and Anahi in the background – I knew where the sun would be rising and the clouds were changing so quickly I discounted them from my composition.

    The two primary Elemis of this photo were the church and the rising sun.

    Where was the photo taken?

    On the top of the caldera near I N Ayiou Mapkou church, which is, and forgive me for repeating myself, one of my favorite places to see the sunrise in Santorini.

    There is more than one photo taken from this location that is featured in the images on this website.

    You can see the location on the screen shot from the Map Module in Lightroom. The orange tag with the number 5 is the actual location at which this photo was taken.

    What time of day was the photo taken?

    5.35am.

    What photography gear did I use to get the shot

    • Canon 6D
    • Canon 17 – 40mm F4 L Lens (focal length used 17mm)
    • Manfrotto 190 Go tripod with geared head
    • Loupe Viewer
    • My thick red hat
    • Oakley sunglasses
    • Pepsi Max – althugh coffe would have been better
    • Red shoes with thin socks (cold feet today)

    What camera settings did I use?

    • Aperture F16
    • Shutter speeds 1/320th second, 1/1250th second and 1/80th second.
    • ISO 400 to get the fast moving clouds. ISO 400 on the Canon 6D really isn’t a problem – the sensor can give a super clean image at this sensitivity. To be honest if I took a photo at ISO100 and the same picture at ISO400 you would struggle to tell the difference.
    • Back-button focus
    • AV Mode
    • 10 second self-timer
    • RAW format

    I used F16 to get as much depth of field as possible. I only use F22 if I am super close to the foreground, or if I am trying to get a starburst effect – other than that the smallest aperture I will use is F16.

    I mention this as the aperture is the only variable whan I am photographing a sunset. AV Mode means that the shutter is selected by the camera to match the chosen aperture. I will have set the ISO before shooting at a particular location.

    One interesting fact about the image.

    This is one of a series of images taken from the same spot with my camera mounted on my Manfrotto 190 Go tripod. I photographed the entire sunrise, and chose this photo.

    Is there a behind the scenes video of this shoot?

    Yes. And a photo taken on my iPhone of the actual set up and the view. Ignore the fact it is so bright – it wasn’t when the photo in this post was taken.

    And here is the video.

    How did I process the image?

    This is another HDR shot, composed of three separate images. The first image os the correct exposure, the second image is 2 stops under exposed, and the third image is two stops over exposed.

    The three images ar emerged together in Lightroom, creating a single new Dng file.

    Here are the adjustment settings in Lightroom for this image.

    Processing was done using the Basic and HSL panels. There are some other adjustments, but these are the same for every image, adn are applied on import to save me time and give me a consistent set of images.

    In addition did localised dodging and burning to add to the highlight sand the shadows giving the image additional depth.

    I finished the image in Photoshop removing blemishes, sensor dust spots and irritations in the foreground, bits of plants and twigs and stuff that detracted from the overall scene.

    What could I have done to improve the image?

    Being critical I could have come up with a different composition. I could have moved more to the right and done a much tighter shot of the church and the sunrise – that would have worked nicely.

    That is not better, just an alternative point of view.

    And I have chosen this image from a long sequence of images of that sunrise.

    And what are my thoughts on this image?

    I like it. It is not your run of the mill Santorini sunrise photo – it has darkness, mood and depth to it. I always try to create something a bit different, and also to convey the mood and feel of the place at that precise moment, which I think I have done here.

    Sunrise can be a dark and sinister time, especially on top of a caldera on your own with the clouds flying by, the wind blowing over the top of the island and the sound of barking dogs in the distance!

    And that is why I love being out and about on my own before sunrise – I am normally the only person inthat palce at that time.

    Can you feel these things looking at this photo? This for me is a really good image for conveying that time and that moment, which is all I want to achieve with my photography.

    Enough of me – what do you think of this image?

    Let me know your thoughts on the photo of a Santorini sunrise – do you like it? Is it too dark? Do you like the composition?

    One last thing

    If you want to buy this image, or want to speak to me about future collaboration email me at sales@rickmcevoyphotography.co.uk.

    Rick McEvoy ABIPP – Photographer, writer, blogger


  • Where are the best views from swimming pools on Santorini?

    Where are the best views from swimming pools on Santorini?

    Picture of the lovely swimming pool at the Kasimatis Suites in Imerovigli on the Greek Island of Santorini. The pool has spectacular views across the Caldera towards Thirasia where the sun will set in about an hour from when this photo was taken

    Views from swimming pools on Santorini. I know – that is quite a demanding ask now isn’t it?

    We work hard all year to enjoy our breaks, so there is nothing wrong with asking the question “Where are the best views from swimming pools on Santorini?”

    Well this view from the pool at the Kasiamtis Suites is my favorite so far – what a view of the pool, the balcony and in the background a little bit of the caldera!

    Why do I like this photo so much?

    I did take a photograph from the balcony but something was missing. So I took a step back from the view from the pool to get a photo of the view of the pool if that makes sense) and that lovely burst of Santorini sunshine.

    And I managed to get a bit of the view from the pool and the deckchairs – hopefully you get the idea from this photo.

    And a band of orange as the sun begins to set on another wonderful day in Santorini.

    How did I decide on this composition?

    Simple. I wanted the pool, the area to the front of the pool, a bit of the background and of course that big bright burst of golden sunshine. And the reflection off the pool was something I had pre-planned.

    That is the beauty of staying in such a photogenic hotel – just by being there you get used to the movement of the sun, the shadows, the little things that when added together can make a photo.

    Well you do if you are like me. I am always looking for things to photograph. On a shoot like this many of the compositions come to me when I am walking around doing innocuous things like walking to breakfast (on the day we did not have breakfast in our rooms that is).

    Being aware of your surroundings and constantly looking out for photos might annoy the family but for me is an occupational hazard I’m afraid!

    Where was the photo taken?

    This photo was taken at the swimming pool of the Kasimatis Suites in Imerovigli on the Greek Island of Santorini.

    We were stopping at the Kasimais Suites, and had to walk past the pool and this view just to get to reception. Awful I know!

    What time of day was the photo taken?

    Late afternoon in April, just after 4.30pm. The sun has begun to drop, having traversed from the left to the right – yes this is the prefect photographic orientation.

    I took this photo having returned from a long day consisting of sunrise on the caldera, a lovely breakfast in our room and a good investigation of the capital of Santorini, Fira. I did an early afternoon wander and got back in time to get this shot by the pool.

    After this I have to confess to having a couple of beers and photographing the sunset from our room. Yes I was that tired!

    As I have said before sunset can be a bit of an anti-social time of day, clashing with evening drinks.

    What photography gear did I use to get the shot

    • Canon 6D
    • Canon 24-105mm F4 L Lens
    • Handheld – no tripod required
    • And probably a pair of sunglasses
    • My loupe viewer

    What camera settings did I use?

    • Aperture – F22
    • Shutter speeds – 1/800th second, 1/3200th second and 1/200th second
    • ISO – 400
    • Focal length – 24mm
    • AV Mode
    • Back button focus
    • Auto bracketing
    • Handhed
    • Live view

    A quick word on the camera settings. F22. Why use that aperture? Simple.

    F22 on my Canon 24 -105mm lens gives me that lovely starburst effect. F22 is the minimum aperture, ie the aperture which lets the least light in, as the opening through the aperture blades is at its smallest.

    Try shooting into the sun (with care so you don’t damage your eyes) and try all the apertures and see what you get with your gear.

    Which leads me onto the next point. When I am shooting straight into the sun, I use the Live View function on my Canon 6D. Much safer. And even then I will have my sunglasses on.

    Unless I am using my loupe viewer.

    One interesting fact about the image.

    Erm. I didn’t go in the pool? All I can remember is that the sun was blindingly bright and I was desperate to sit down and have a drink but did not want to miss a second of that spectacular day.

    I was tired, thirsty and loving it!

    One bit of irrelevant advice – if you want to make a living doing photography it is best that you absolutely love it as it is hard work.

    Is there a behind the scenes video of this shoot?

    No. I think people who take videos around swimming pools with people in the vicinity sunbathing are approaching creepy.

    Swimming pool/ people = no video!

    How did I process the image?

    Very well thank you. To be honest once I have processed the first couple of images from a days shoot a lot of the processing is the same, or fairly similar.

    I want the images to look like a coherent set of images after all, so the color treatments and other stuff need to compliment other images.

    The difference is with the local adjustments, which are individual to each and every image I produce.

    I am talking here about

    • Dodging and burning
    • HSL adjustments
    • Radial filter

    What could I have done to improve the image?

    A higher viewpoint would have made the composition stronger. If I could have got my camera higher I would have been able to include more of the caldera view in the background.

    Unfortunately I did not have my stepladders with me, nor my 5m painters pole, and I could not move back any further (from recollection).

    Yes lets just say that I was constrained by the buildings around me. I will just have to go back to Kasimatis Suites and do a better job next time!

    And what are my thoughts on this image?

    I really like this image, I have captured a lovely flat swimming pool illuminated by the sun. I have managed to include a snippet of the view of the caldera, but more importantly the deckchairs on the edge of the balcony.

    And I love the colors in the sky, that lovely bright blue transitioning into the orange of the setting sun.

    The bright vibrant colours are an essential part of my travel photography work.

    And there are no people in the image which is both good and bad.

    All in all an image that I am happy to share on my website and write about.

    Enough of me – what do you think of this image?

    You have read what I have to say about this photo of the view of a swimming pool at Kasimatis Suites in Imerovigli – what do you think of the image, and do you have any questions for me?

    One last thing

    If you want to buy this image, or want to speak to me about future collaboration email me at sales@rickmcevoyphotography.co.uk.

    Rick McEvoy ABIPP – Photographer, writer, blogger


  • Probably one of the best Santorini photo locations?

    Probably one of the best Santorini photo locations?

    Picture of sunrise on the Greek Island of Santorini, with the view looking towards Imerovigli from the top of the Santoini Caldera. Never before have I seen both cold blue and sunrise warmth in the same image

    A fundamental question when going on a photography trip is where to take photos from. Now I don’t do extensive research before I go on a trip, but I do have a quick look so I get a general idea of what I will be wandering around.

    So the fundamental question is this – is the caldera one of the best Santorini photo locations? In my opinion clearly this is a yes – I took all the photos on this website on the caldera, and only left the caldera (reluctantly) to go home!

    Why do I like this photo so much?

    Simple. It is the first image that I have captured which shows so clearly the different colour temperatures before sunrise and during sunrise in one image. To the right the light is cold and blue, and to the left you can clearly see the warmth provided by the rising sun. And you can also see the transition from cold to warm in the clouds in the sky.

    I have never captured this before in one image in quite such a dramatic way – that was the beauty of the location I was taking the photo from. And the beauty of taking photographs on the wonderful Greek Island of Santorini. Every day on Santorini the sunrise was different – it was quite amazing to witness.

    The image also gives a great representation of the topography of the island, with the buildings visible on the top of the caldera to the west, with the island gradually falling down to the sea to the east.

    And it also shows the value of getting up early in the morning and getting out there! Even on holiday I love doing this.

    Sorry that reminded me – my favourite images tend to be ones taken at sunrise, which is my favourite part of every day. There is something special about being the only one out there watching a new day unfold.

    How did I decide on this composition?

    I had already walked past this location and made a mental note of the unrestricted view of Imerovigli and so much of the island. I was up and about early that morning and quickly found this spot again.

    I realised that from this viewpoint I could show the topography of the island from a different angle, as well as the coastline on both sides of the island. To be honest I have not seen this particular view before. Not that I do extensive research before I visit a location.

    I wanted to show the contrast in the coastlines, the east coast having gentle sloping land down to the sea, with the west coast consisting of steep plummeting cliffs.

    I wanted to show the shape and size of the caldera on the main island.

    I also wanted foreground content which showed the terrain away from the built-up areas.

    I wanted to represent Santorini in one photograph.

    Where was the photo taken?

    The photo was taken from the top of the caldera, right where the number five is on the Lightroom Map extract.

    This is a great location to take photos from – just to the left is the church that features in some of my other images you can see on this website.

    This is one of the reasons why GPS in a camera is so important in my travel photography – I can see exactly where I took every photo which is invaluable in the work that I do.

    And also the reason I scout my own locations so I get the compositions that I want, and not the headline shots that everyone else seems to go for.

    What time of day was the photo taken?

    Just after 6am in the morning. I was up long before 4am on this morning as I knew where I was walking to for the sunrise.

    What photography gear did I use to get the shot

    • Canon 6D
    • Canon 17 – 40mm F4 L Lens (focal length used 17mm)
    • Manfrotto 190 Go tripod with geared head
    • Loupe Viewer
    • My red hat
    • Oakley sunglasses
    • Pepsi Max
    • Red shoes (feet already acheing by now)

    What camera settings did I use?

    • Aperture F16
    • Shutter speeds 1/50th second, 1/200th second and 1/13th second.
    • ISO 400. I was surprised that I used an ISO of 400. But thinking about it the clouds were moving, and I didn’t want the shutter speed too slow or I would have got blur in the clouds. ISO 400 on the Canon 6D really isn’t a problem – the sensor can give a super clean image at this sensitivity.
    • Back-button focus
    • AV Mode
    • 10 second self-timer
    • RAW format

    One interesting fact about the image.

    Well the range of colour temperatures for one thing – I have never captured them quite like this before. Other than that no dramas on this shoot.

    Is there a behind the scenes video of this shoot?

    Yes – there is the 360 view I captured using my iPhone not long before the image was taken. You can check it out on YouTube.

    How did I process the image?

    Firstly I merged the three images together in Lightroom to create a single image.

    The challenge with this image was to get the white balance correct, as I had two colour temperatures in the same image – talk about mixed lighting!

    To get the white balance correct I used the eye dropper tool and selected a neutral part of the clouds, which I found in the end! I went to the middle of the image, where the two light sources met. All you need to do is move the eye dropper tool over what looks like a neutral part of the picture, and get the three numbers as close as possible, and then click and tht is that done!

    After that processing was done in the Basic Panel in Lightroom, which I did using the Vibrance slider before moving on to the HSL Panel. Here I played around with the colours and luminances – what I was trying to recreate was the scene that I remember seeing with my own eyes. I can still picture that wonderful scene with the warm light to the left and the cold light to the right – such a stunning natural occurrence.

    I finsihed off the image with a bit of cleaning up in Photoshop, removing sensor dust spots and irritations around the edges – no major editing to be fair.

    What could I have done to improve the image?

    Hmmm. Well I could have moved somewhere else and got a lovely white church in the foreground but I wanted to convey the topography of the Santorini caldera without a building in the composition.

    I am after all looking to capture a range of images, not throw everything into every image.

    Less is more.

    And to be honest I am very happy with this image.

    And what are my thoughts on this image?

    I like this image a lot. Once I had selected the first 20 images for this website this was the first one that I uploaded. This is one of my favourite photos of Santorini.

    I love the two colour temperatues in the image – I have never captured these before.

    And I also like the fact that in one image I am showing the contrasting landscape, with the gentle slope to the east and the cliffs of the caldera to the west. You can just see the white buildings of Imerovigli on the top of the caldera in their spectacular, iconic Santorini location.

    I wanted an image that told the story of Santorini in one image, and also an image that was different from most of the photos of Santorini that you see on the internet.

    Enough of me – what do you think of this image?

    Yep what do you think? Please let me know as at the end of the day I have an emotional attachment to this photo.

    And I really do appreciate feedback on my photographs.

    One last thing

    If you want to buy this image, or want to speak to me about future collaboration email me at sales@rickmcevoyphotography.co.uk.

    Rick McEvoy ABIPP – Photographer, writer, blogger